by Dave | Sep 29, 2018 | Articles, How To ..., Landscape Photos, Lightroom, ON1 Software, Photo Processing, Photo Tips, Photo Tutorials, Photoshop, Software
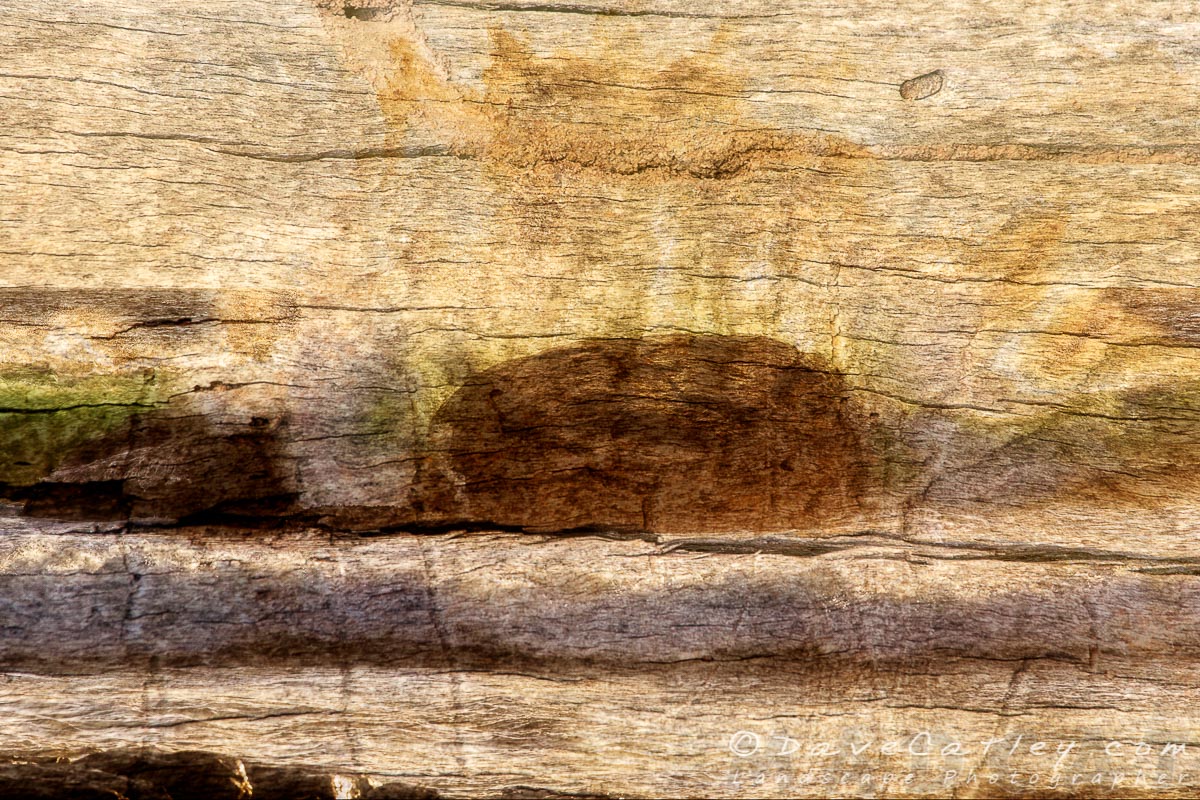
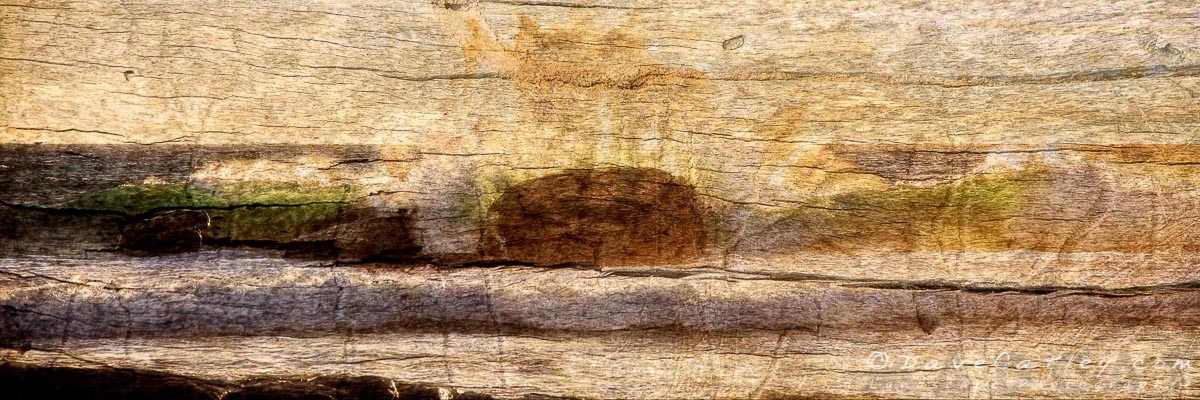
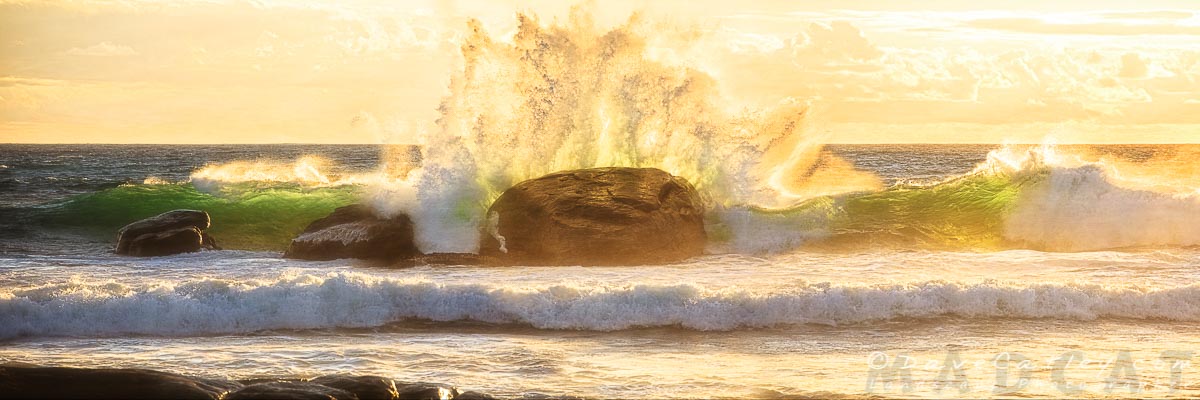
Waves on Wood is an new image I have created recently to give the illusion of a photographic print on a wooden plank. The original image “Crashing Waves” on Redgate Beach in Margaret River can be seen & purchased here.
While it is possible to transfer images onto wood or even print directly on wood it is not a process that is available or practical for many of us so I have been playing around with a process in Photoshop for combining photos and textures to give the illusion of a print on wood.

Waves on Wood, Redgate Beach, Margaret River Region, Western Australia – Photographic Art
How cool will this look as a 60″ canvas in your living room?
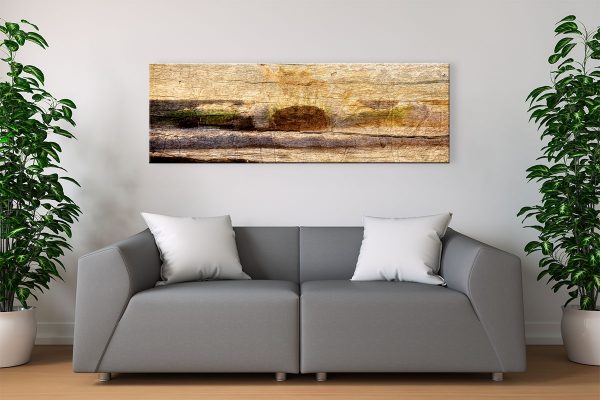
Waves on Wood, Redgate Beach, Margaret River Region, Western Australia – Living Room Canvas
Compare the Textured Image with the original image “Crashing Waves on Redgate Beach”
Post Processing
If you’re interested in the technique used to create this effect then here are the basics (though the exact settings will vary depending on the photo & the textures being used):
- Open your image in Photoshop
- Open your texture image in Photoshop and resize it to the same dimensions as your photo
- Copy and paste your wood texture over your photo as a new layer
- Set the blending mode of the texture layer to
- Set the blending mode of the texture layer to something like “Darken” or Multiply”
- Duplicate your texture layer (CTRL/CMD + J)
- Set the blending mode of the second texture layer to “Soft Light” or “Overlay”
- You can now adjust the blending modes & opacity of the texture layers to get an effect you like
- You can also replace one of the textures with an alternate texture for different effects or even add additional textures, the sky’s the limit
This image was created using a combination of Adobe Lightroom Classic CC, Adobe Photoshop CC 2018 & ON1 Photo RAW 2018.
Visit Our Gallery
Visit our Gallery at Shop 136 Wanneroo Markets, 33 Prindiville Drive in Wangara to see more of our Fine Art Images & Photo Products.
Also available at the Gallery are Greeting Cards, Magnets, Keyrings, unique 3D Printed Gadgets & Gizmo’s and much more …
Cheers,
Dave
by Dave | Jan 27, 2018 | Lightroom, ON1 Software, Our Journey, Photos, Photoshop, Software, Wildlife Photos
Perth Zoo is an amazing place to visit and experience some of the incredible wildlife from Australia & around the world. To be honest we haven’t been to the Zoo for many years, must be time for another visit, I’m sure there have been many changes over the past few years.

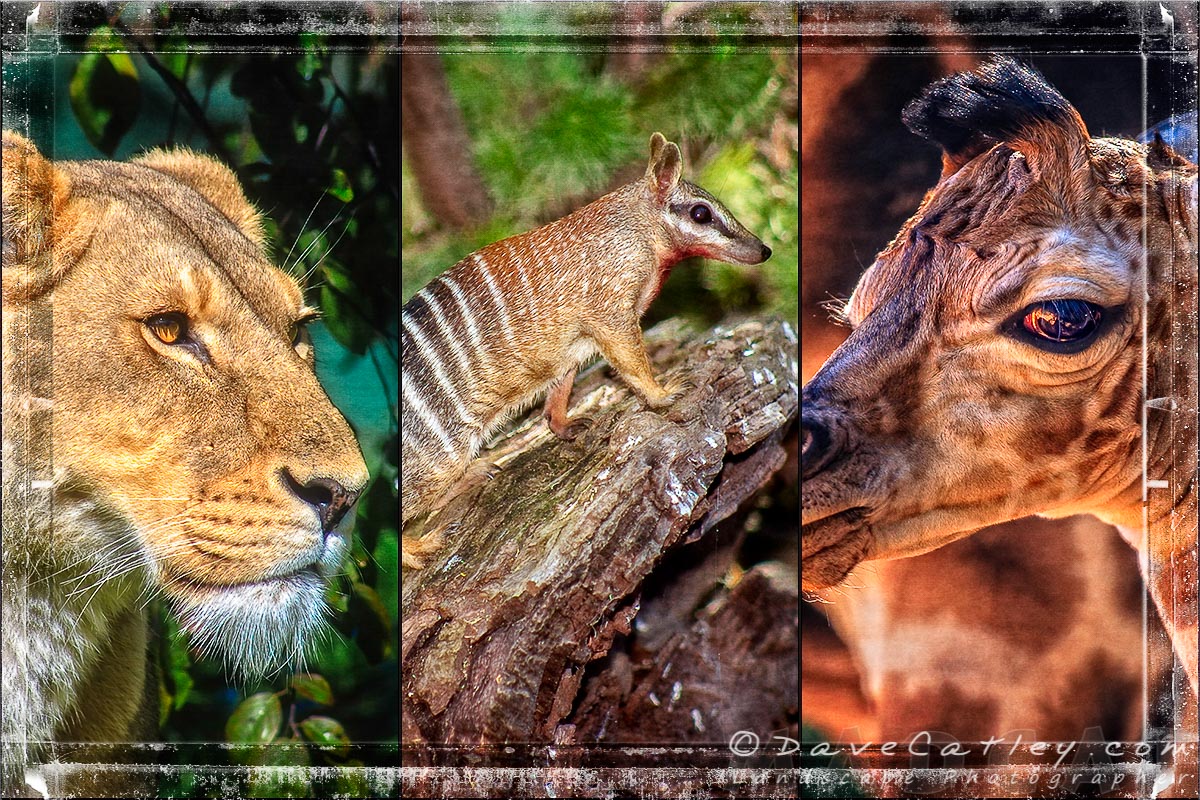
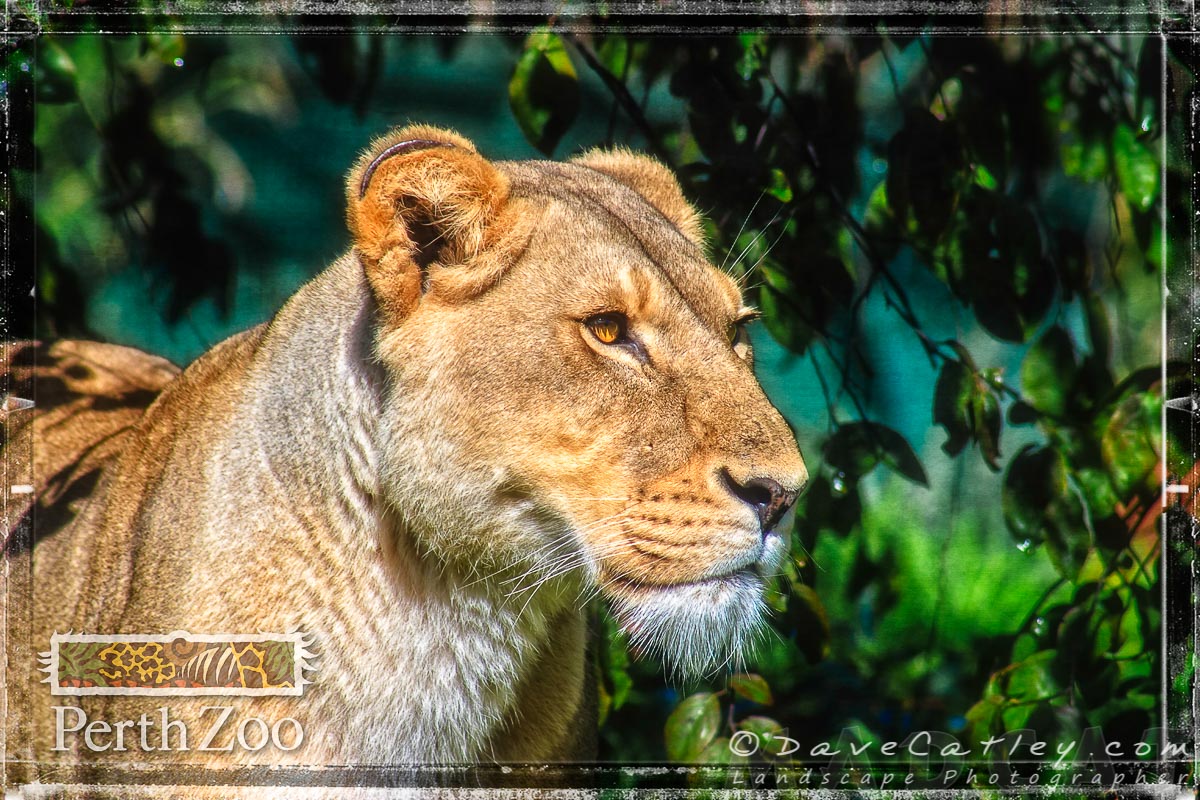
African Lion, Perth Zoo, South Perth,Western Australia
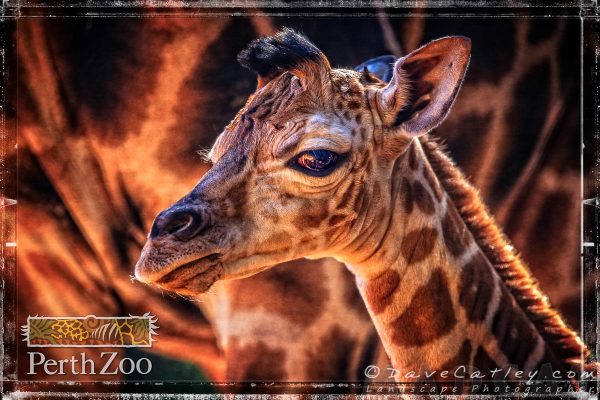
Baby Giraffe, Perth Zoo, South Perth,Western Australia

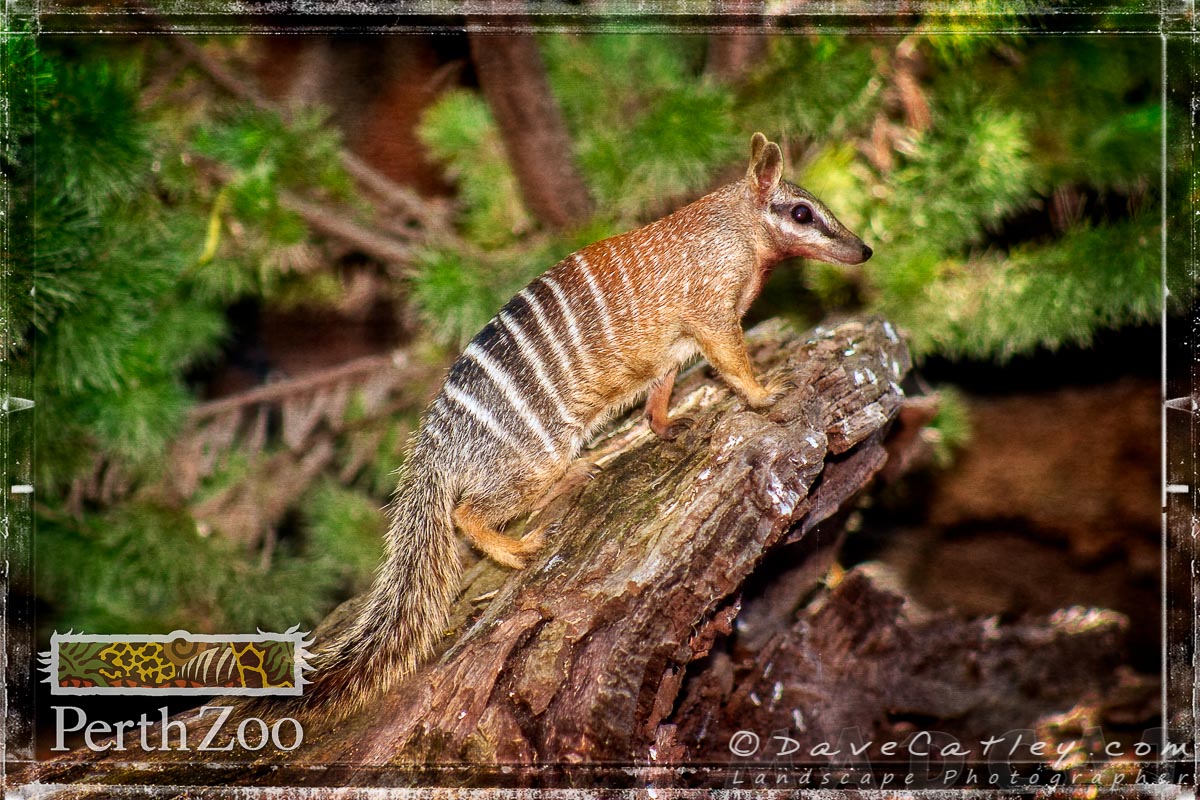
Bonzai the Numbat, Perth Zoo, South Perth,Western Australia
These gorgeous creatures were captured during our visits between 2003 & 2010 when we were working with the Zoo on their website and I decided to have a play around with them to create some Perth Zoo Photo Art.
Sadly Bonzai the Numbat has since passed away but we were proud to have our images used on the signage around his enclosure for a few years before he died.
Perth Zoo and many other zoo’s around Australia and the World do an amazing job help protect & preserve our wildlife, we owe it it to them to do what we can to support these efforts.
Post Processing
All images were processed in Adobe Lightroom, ON1 Photo RAW 2018 & Adobe Photoshop.
Buy Prints & Photo Products
Did you know it’s a proven fact that being out in nature is great for your mental and physical health!
While you won’t get the full health benefit from our range of prints and photo gifts they are always a great reminder of where you’d rather be.
So be sure to check out our range of Fine Art Prints here in our online gallery and our unique photo gifts (scarves, wall tapestries, beach towels, tote bags and much more) at madaboutwa.com.au.
Note: Our Perth Zoo images are not for sale currently though we would dearly love to create more amazing images and products that could help support the Zoo.
Cheers, Dave

by Dave | Jan 1, 2018 | Lifestyle, Lightroom, News, ON1 Software, Our Journey, Photo Tips, Photos, Photoshop, Software, Wildlife Photos, Workflow
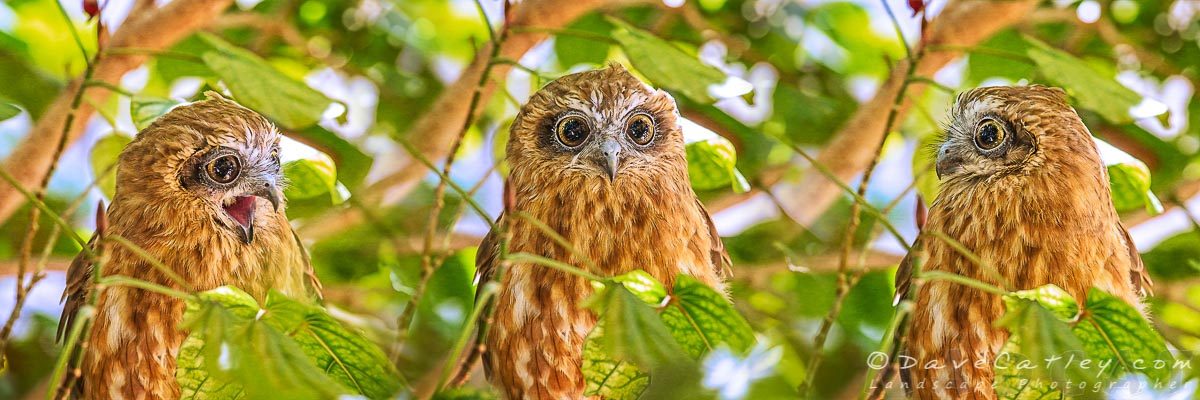
Southern Boobook Owl Triptych, Mindarie, Western Australia
Bird photography can be a time consuming process but rewards can pay of at the least expected times. a few days a go I got a call from my mum to say she had spotted a small owl in her back garden. As an avid owl lover mum has owl ornaments and images all around her house & garden so maybe this little guy just felt at home in her garden …
Southern Boobook Owl Triptych, Mindarie, Western Australia
Anyway, we headed off to mum’s to check out this visitor of hers hoping that he would still be there … and he was. We found him nestled in the foliage of a small tree in the garden. Luckily for us the tree’s foliage was dense enough to keep him protected but with enough gaps that we could get a good view of him, it’s not often you get so lucky 🙂 Ironically the only reason mum spotted him was because the local birds were going crazy about his presence, fluttering around the tree and and making a rawkus noise. But then it is spring and no doubt they were a little concerned about their nests becoming potential dinner plates!
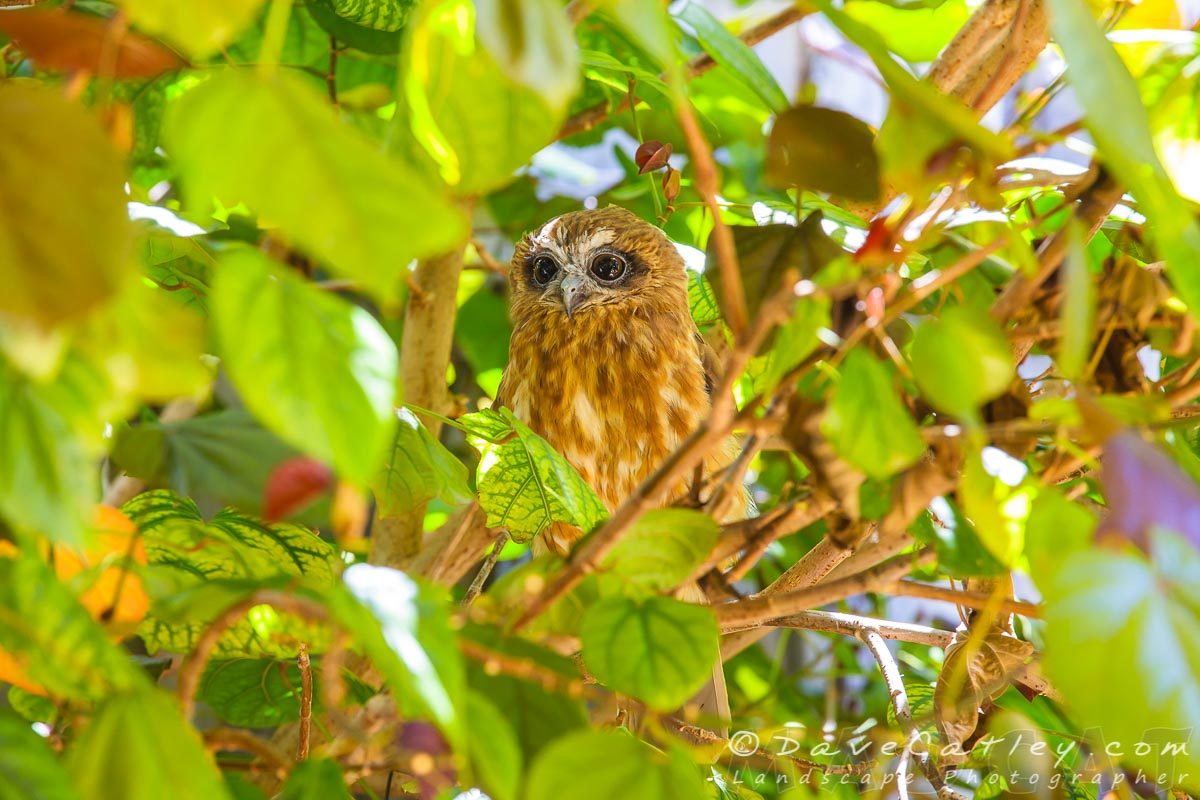
Southern Boobook Owl, Mindarie, Western Australia
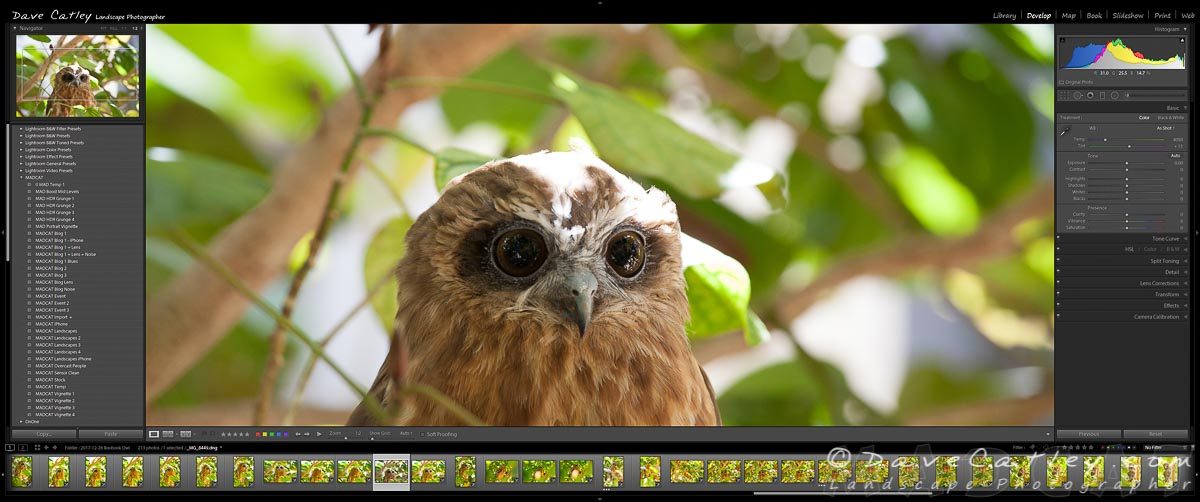
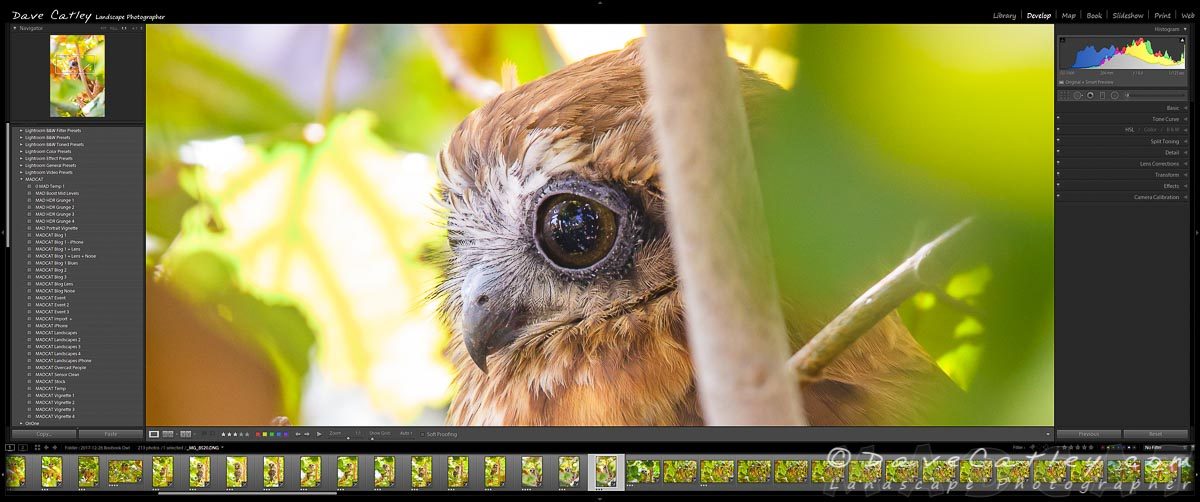
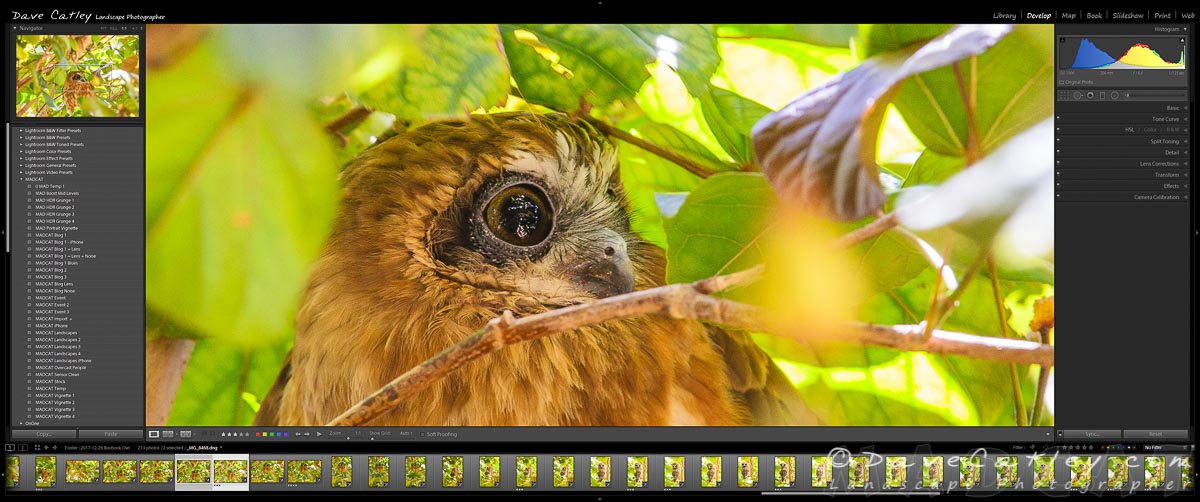
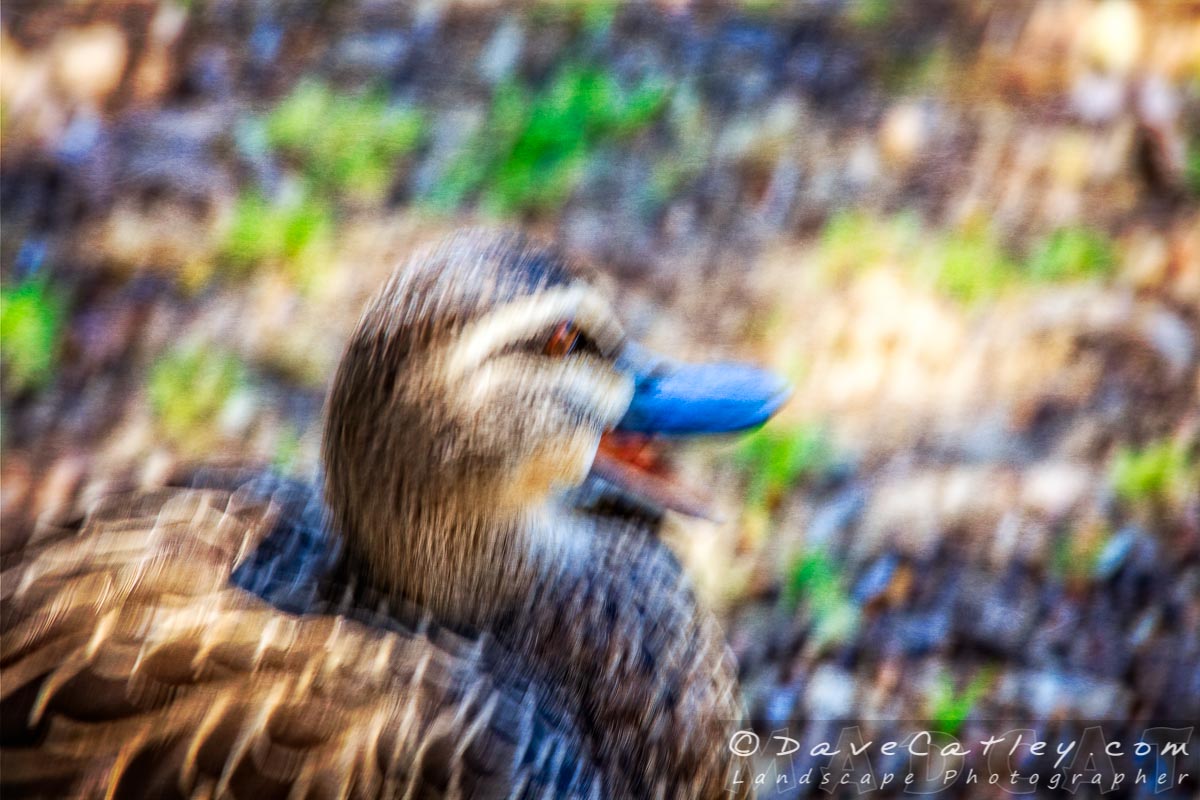
Maggie began looking into what type of owl he was while I started snapping away with my 70-200mm. The late afternoon sun was behind him making the light interesting and challenging. I knew the bright blue glimpses of sky would be blown out but the important thing was getting the owl exposed perfectly and retaining the brilliant green of the backlit foliage. The little guy was barely moving so shutter speed wasn’t so important but I still needed to keep it up high enough to prevent any camera shake. It was pretty dark inside that tree and after a bit of experimentation I compromised at manually setting my exposure to 1/160th, f7.1 & ISO 1000 and I was very happy with how that worked out. Noise levels were very low even with the shadows brightened up in Lightroom and the level of detail around his eyes was astounding as you can see from the exploded view below.

Lightroom Close Up of Southern Boobook Owl, Mindarie, Western Australia
Although the owl was not moving all that much it was a windy day and the leaves were blowing around all over the place making it tricky to frame the owl and causing the sunlight to randomly blow out parts of the owls body.
Blown Out Patches – Southern Boobook Owl, Mindarie, Western Australia
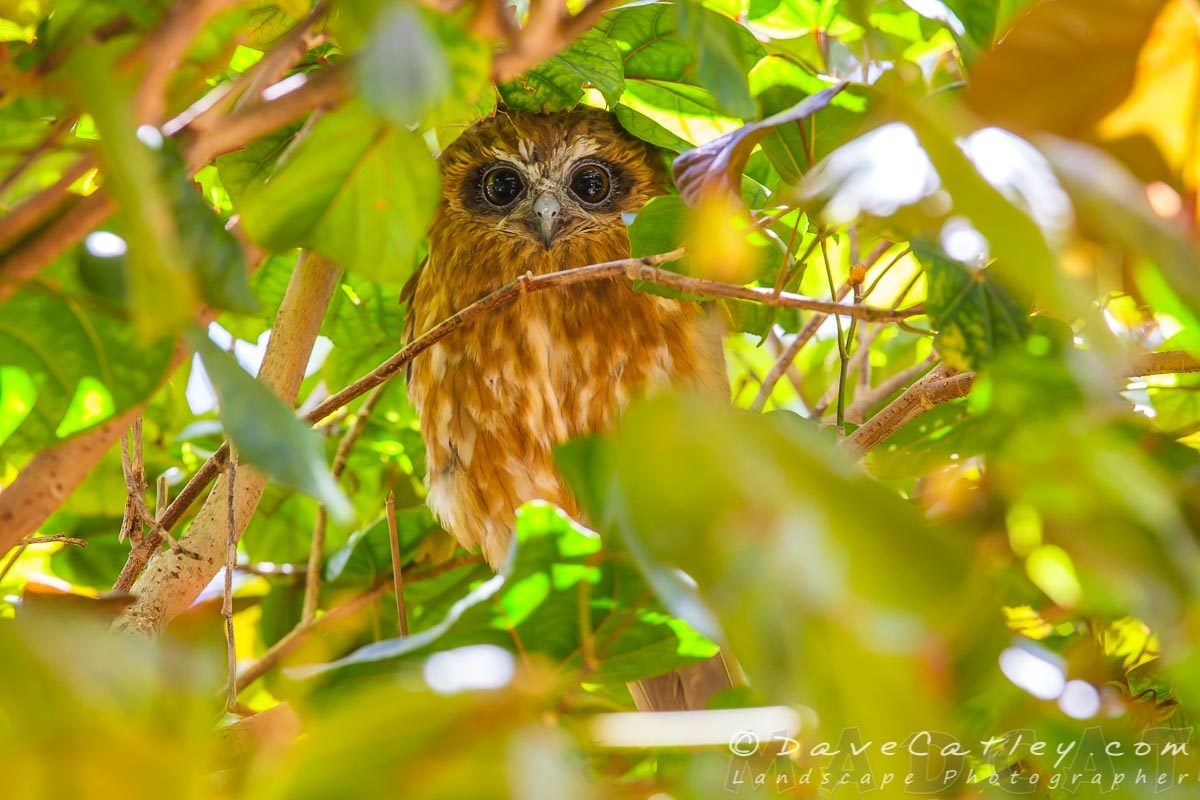
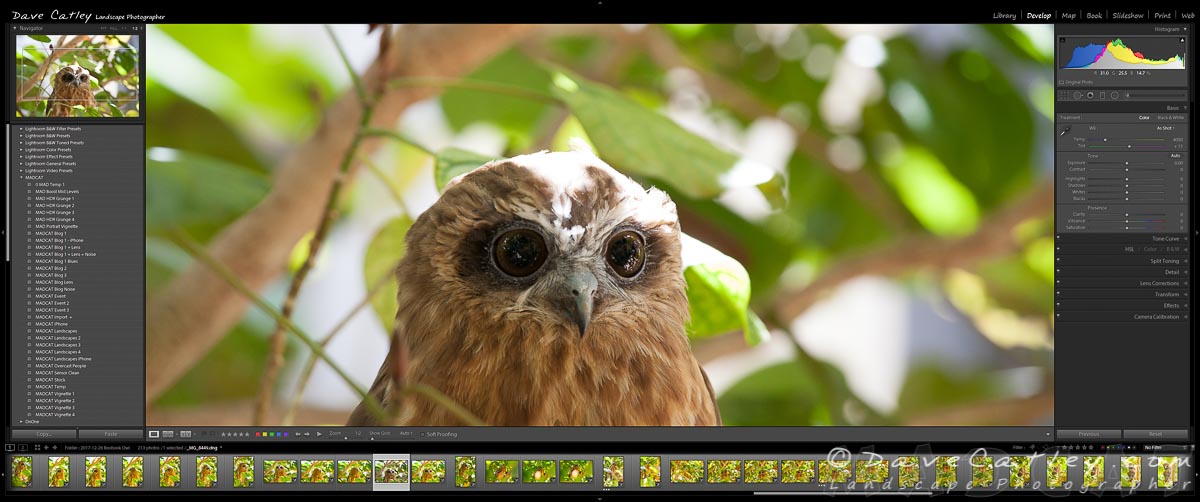
All up we were there for around 40 mins, I took 213 photos and got some crackers. Turns out he was a Southern Boobook Owl, quite common around here though not so much in backyards! One good tip for photographing animals is to always focus on the eyes. At 200mm in low light depth of field is often sacrificed for shutter speed and if the eyes are not pin sharp then the whole image can be ruined.
Focus on the Eyes – Southern Boobook Owl, Mindarie, Western Australia
As usual my initial processing was done in Lightroom followed by adding effects in the new ON1 Photo Raw 2018 with some final tweaking in Photoshop, the Master File is then imported back into Lightroom from where I can export it in any format as required. All 3 tools have their benefits and work well together to produce a final image that is extremely high quality and suitable for any purpose.
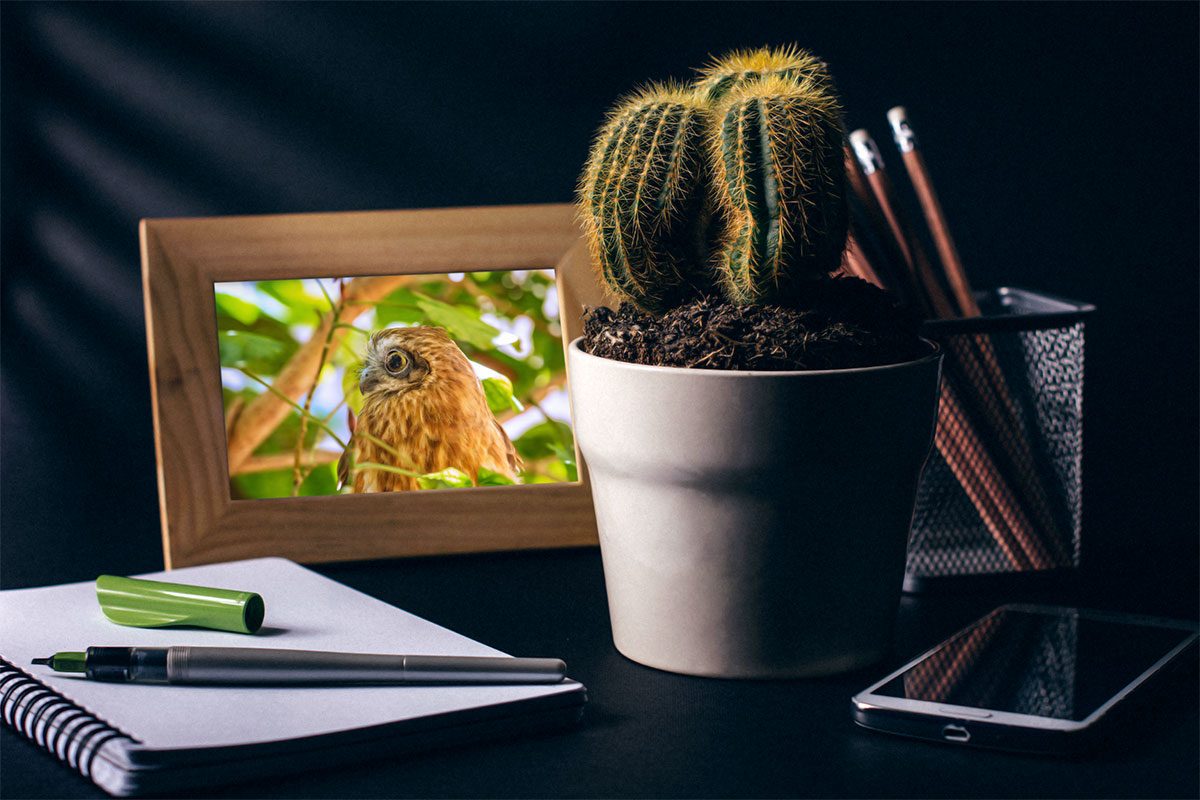
Southern Boobook Owl, Mindarie, Western Australia – Tabletop Print Suggestion
I haven’t really looked at the new version of ON1 Photo RAW 2018 short of using the effects module to create & apply presets. Keep an eye out for my upcoming review of this very interesting photo processing software package that is becoming serious competition for Lightroom.
Image Details
Location: Mindarie Backyard, Western Australia Date: 26th December 2017 Time: 3pm – 3:40pm Camera: Canon EOS 5D Mk11 Lens: EF 70-200mm f/4L IS USM Camera Mode: Manual Exposure: 1/160 sec, f7.1 at ISO 1000
Post Processing
Buy Prints & Photo Products

Buy a Print of a Southern Boobook Owl (WAO1.1-V1)

Buy a Print of a Southern Boobook Owl (WAO1.2-V1)

Buy a Print of a Southern Boobook Owl (WAO1.3-V1)
Our Boobook Owl is also available on a wide range of Photo Products, Home Decor & Clothing at our Redbubble store:
It’s a proven fact that being out in nature is great for your mental and physical health. While you won’t get the full health benefit from our range of prints and photo gifts they are always a great reminder of where you’d rather be. So be sure to check out the rest of our range of Fine Art Prints at madcat.com.au and our unique photo gifts (scarves, wall tapestries, beach towels, tote bags and much more) at madaboutwa.com.au.
Cheers, Dave
by Dave | Dec 16, 2017 | Lifestyle, Lightroom, News, ON1 Software, Our Journey, Photo Tips, Photos, Photoshop, Software, Workflow

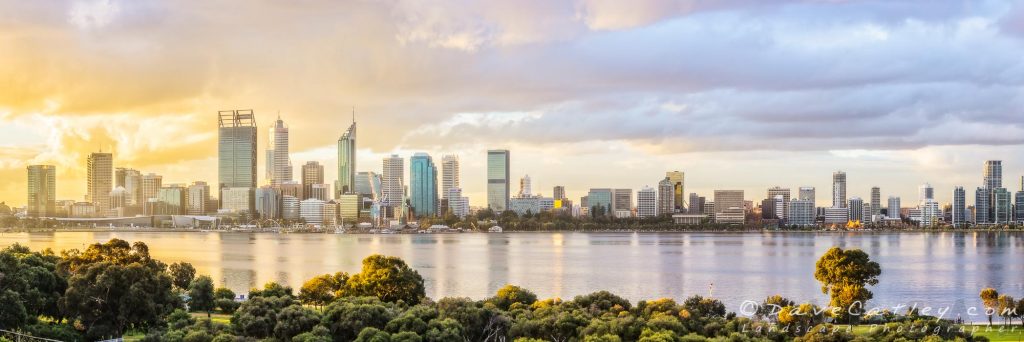
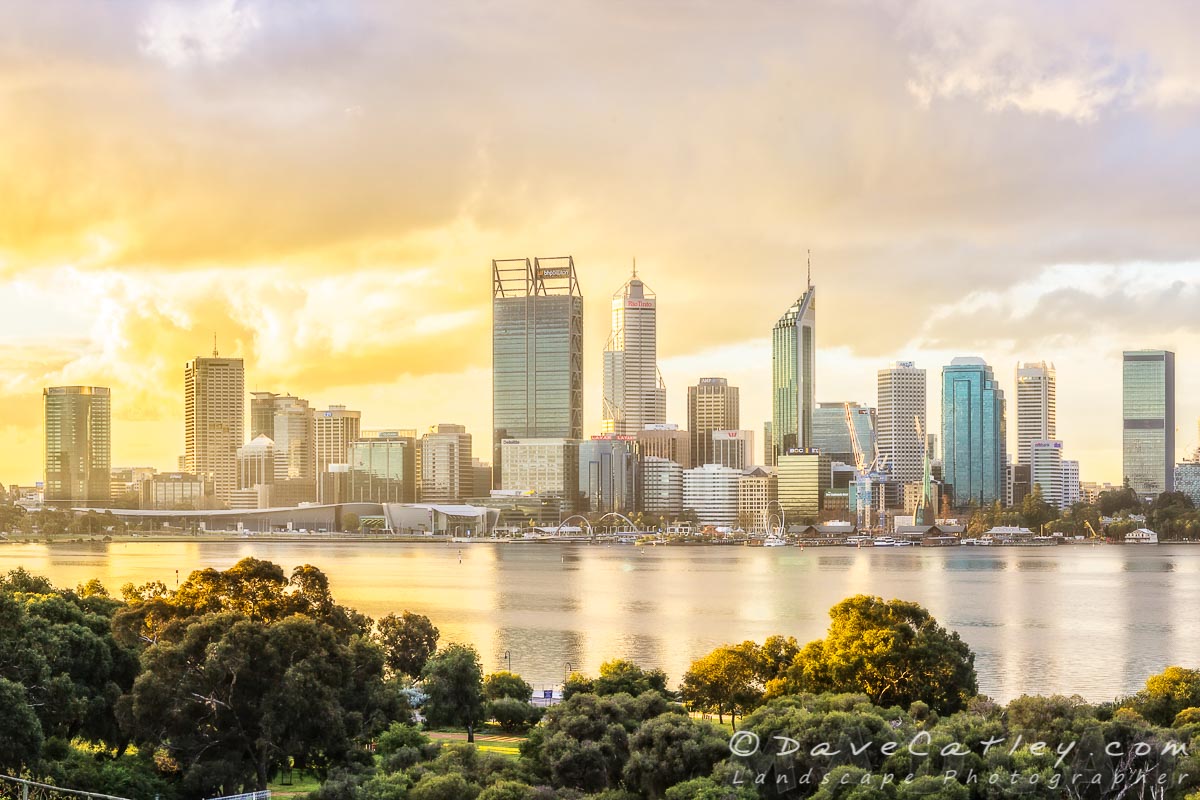
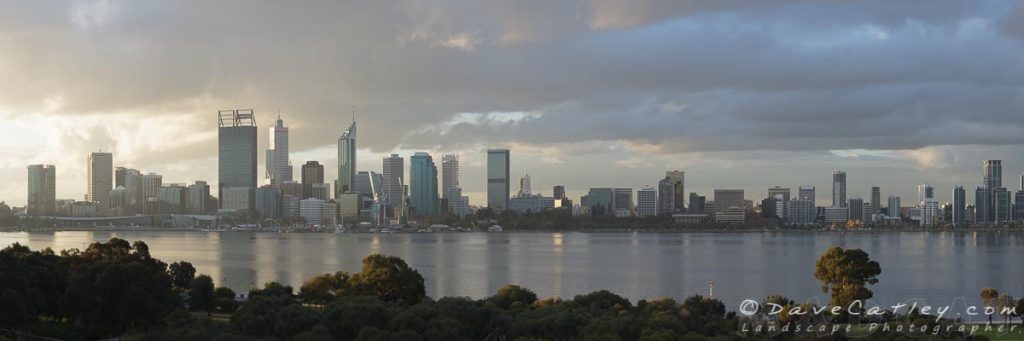
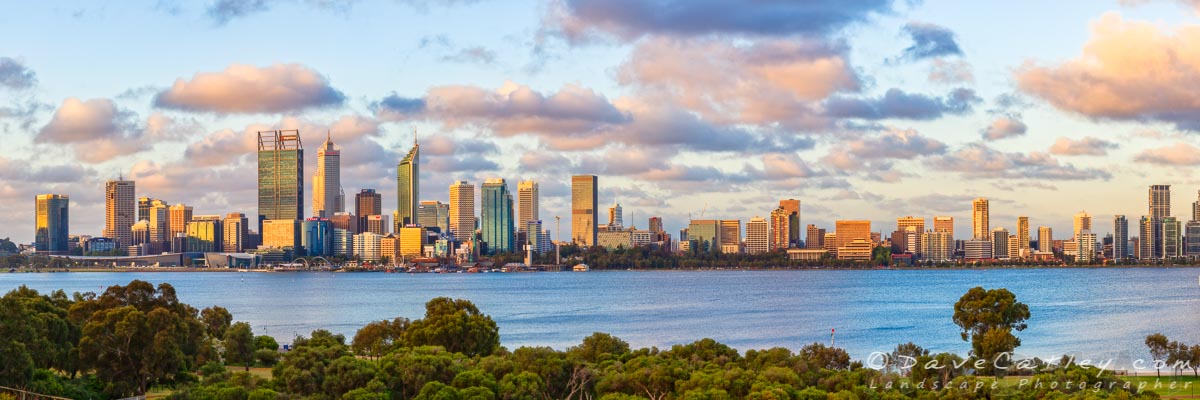
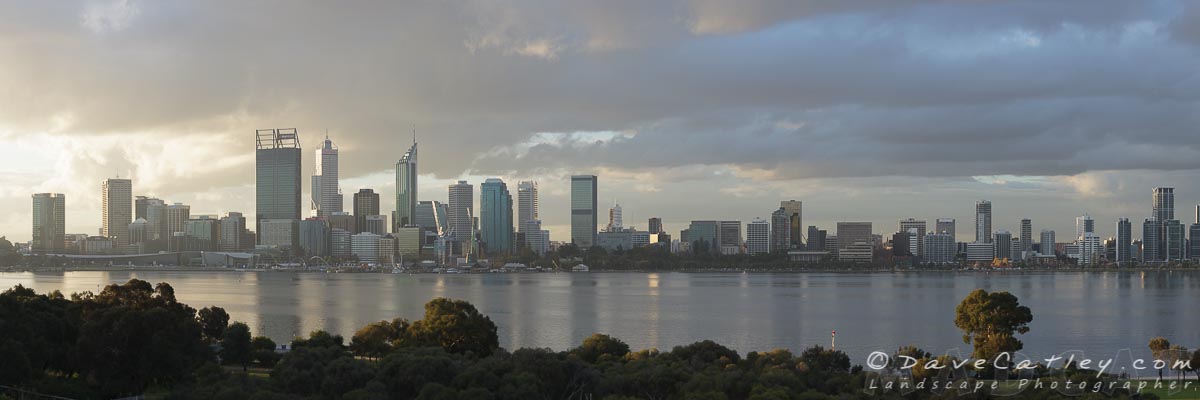
Golden Hues, Perth City Skyline, Western Australia
We spent a lot more time in South Perth recently when my brother visited from the UK so I got the opportunity to view & capture many different colours & sunsets of the Perth City Skyline during November.
This second image in my Perth City Skyline series was taken at 5:15pm as the sun was starting to set. Again we were blessed with a nice amount of cloud coverage picking up some of the colours from the sunset however the difference in how those colours played out compared to my previous shot (see below), taken at a similar time of day, was mind blowing.
Afternoon City Glow, Perth City Skyline – Western Australian Landscape Photography
The light was less diffused and the colours much stronger making for a much more striking scene with rich golden hues reflecting off the buildings. You really never can tell how the natural colours of a West Australian sunset will evolve.

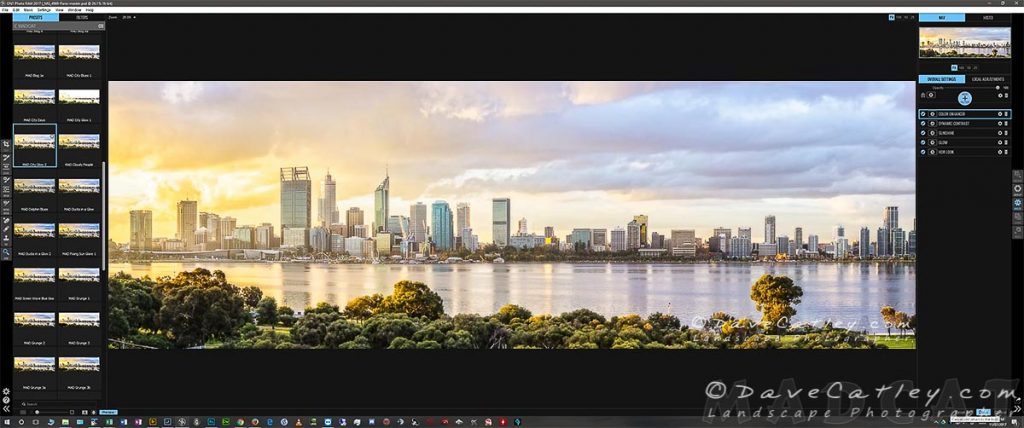
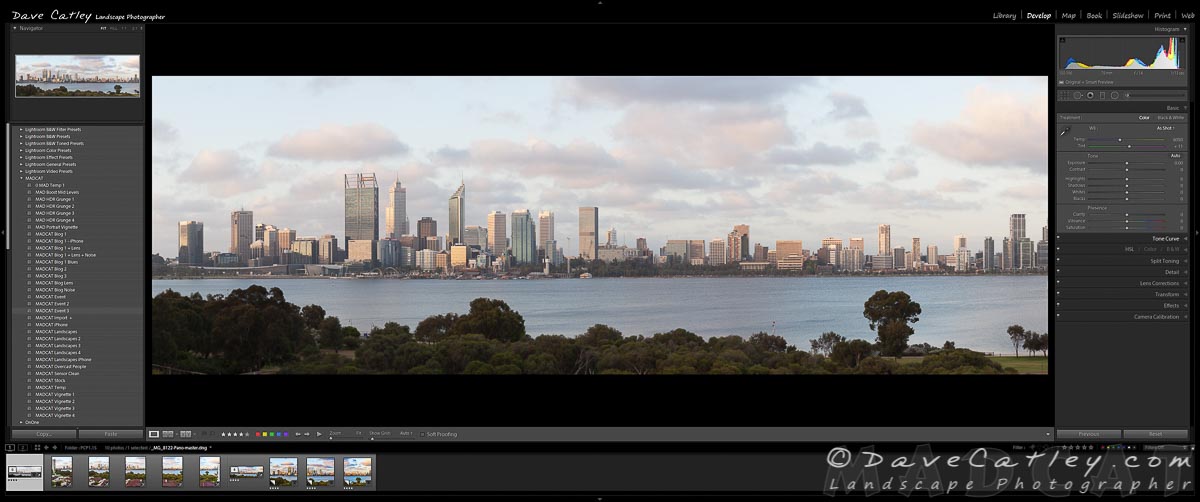
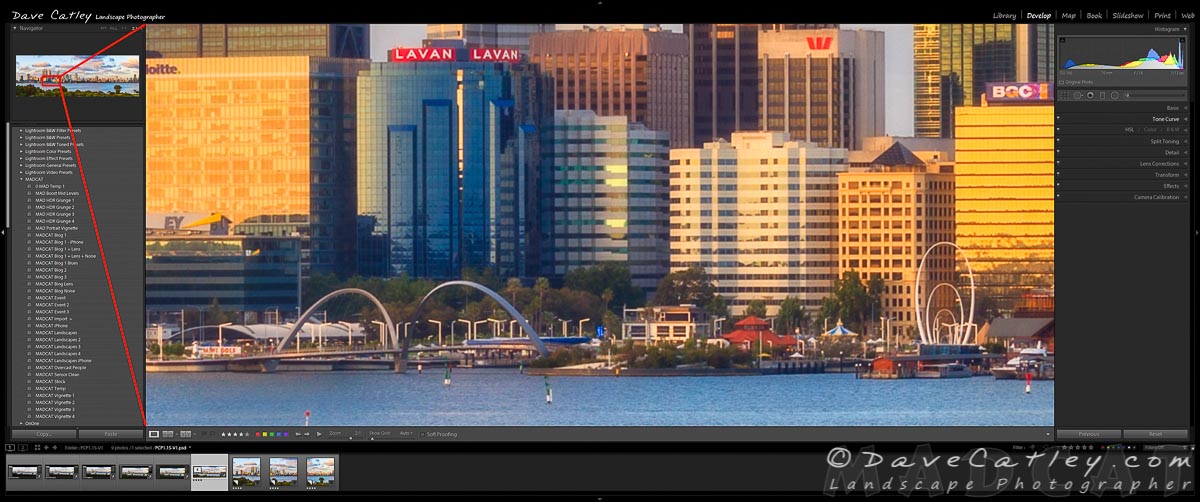
Original Stitched Image in Lightroom, Perth City Skyline, Perth, Western Australia
As before I had my camera mounted on a tripod oriented vertically with my 70-200mm lens set to 70mm. This time I reduced the number of images I was taking by reducing the amount of overlap between each image to about 1/3rd resulting in only 5 images being needed to create the same size 35MP panorama. I also didn’t bother with exposure bracketing as the light variations were much more even.
One thing I love about Lightroom is that when you stitch your images together the resulting image is still in RAW format allowing all of the processing to be done after you have successfully created your stitched image,

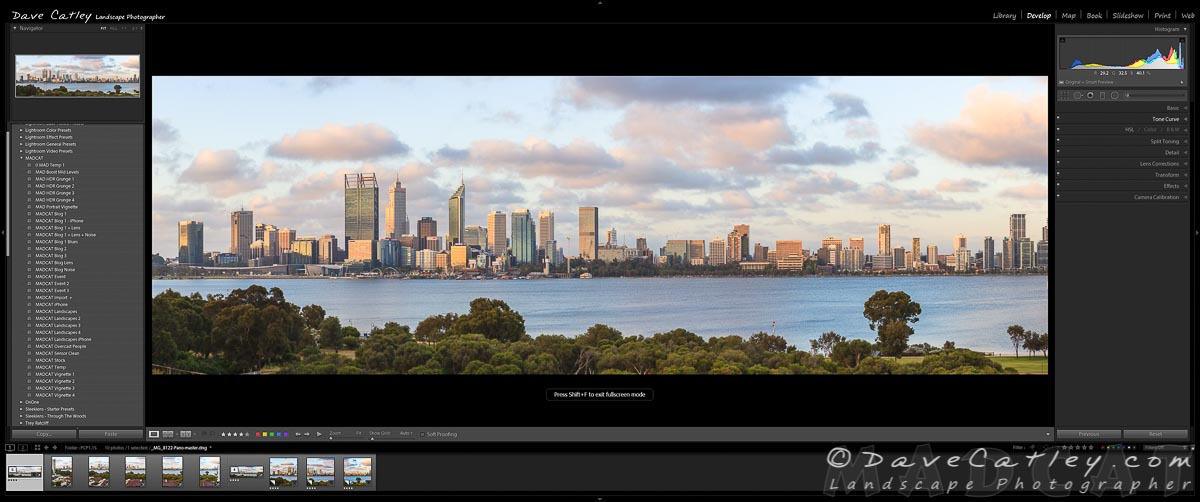
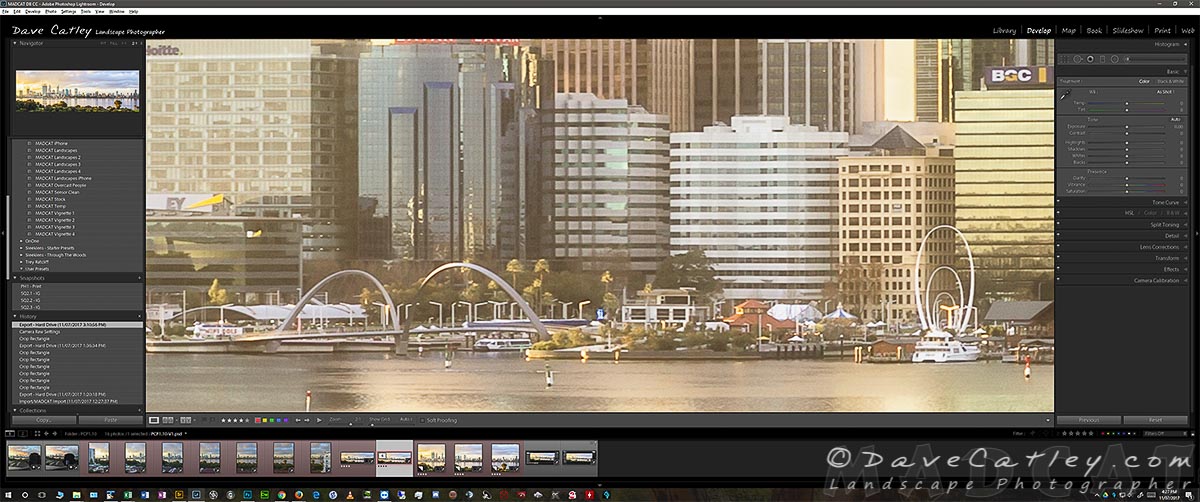
Initial Processing in Lightroom, Perth City Skyline, Perth, Western Australia
My current workflow involves initial processing in Lightroom followed by some adding some effects in ON1 Photo Raw with some final tweaking in Photoshop, the Master File is then imported back into Lightroom from where I can export it in any format as required. All 3 tools have their benefits and work well together to produce a final image that is extremely high quality and suitable for any purpose.

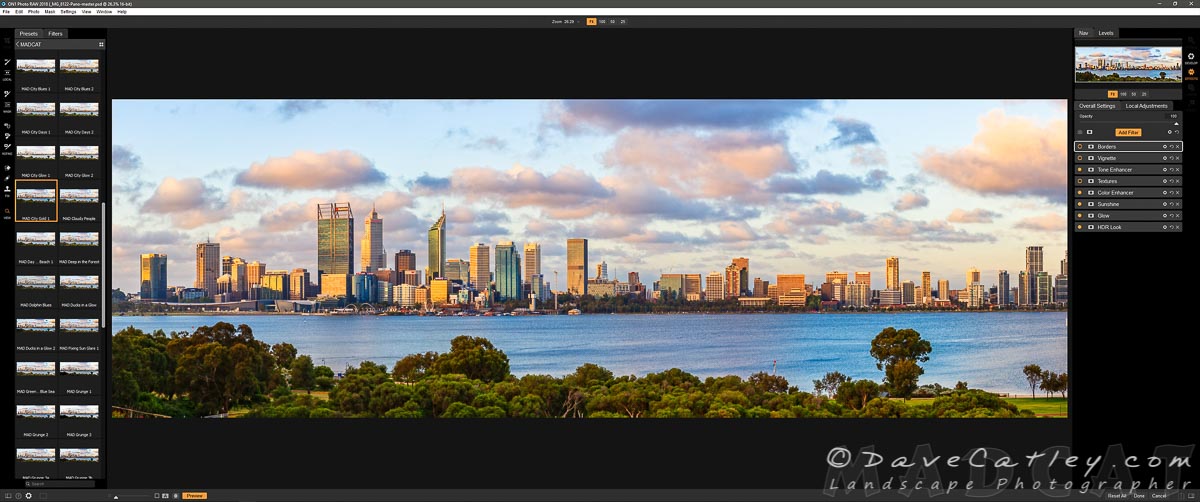
Effects Added in ON1 Photo Raw, Perth City Skyline, Perth, Western Australia
ON1 Photo RAW has been a great addition to my workflow over the past year. I have built up a decent set of Effect Presets which I will be making available through my new online store in the near future. Each new image I process generally starts off from one of my existing Presets and evolves into a new set of effects and eventually a new Preset. It’s such a simple way of creating amazing looking images.
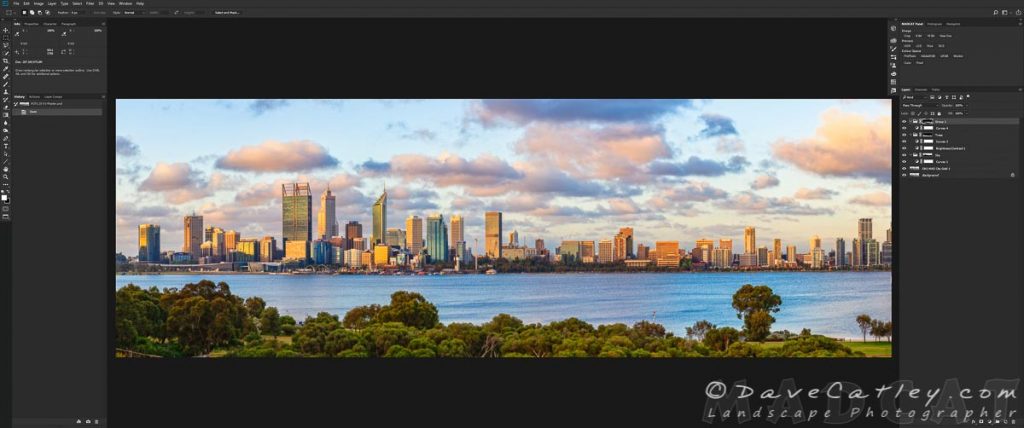
Final Processing in Photoshop, Perth City Skyline, Perth, Western Australia
Photoshop is where everything in the image is held together and the final tweaking is done. My Master File consists of the Lightroom image, the modified ON1 Photo RAW image & any additional changes I make in Photoshop to finish off the image. I am a big fan of non-destructive editing and like to be able to re-visit any part of my post-processing steps at any time in the future which is exactly what this workflow provides.
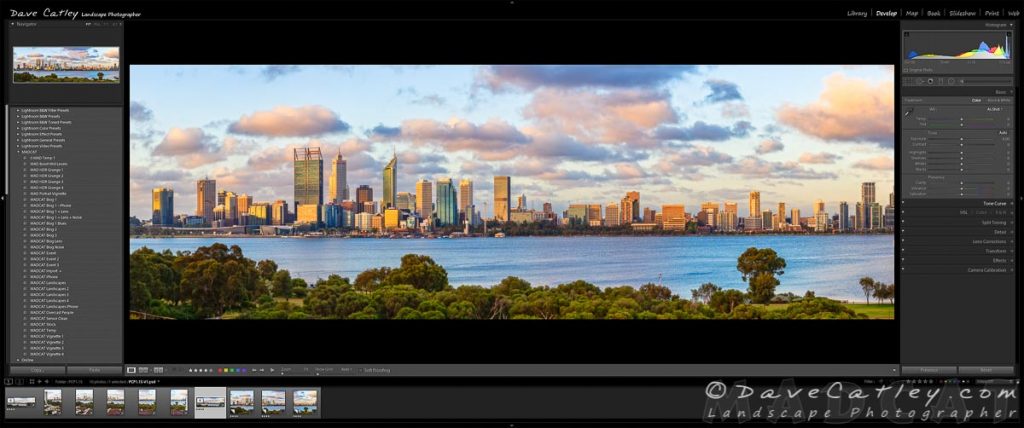
Final Image in Lightroom, Perth City Skyline, Perth, Western Australia
Once my Master File is complete I flatten it, import it back into Lightroom & add appropriate keywords and meta-data. From within Lightroom where I can export it in whatever shape & format I require in the future. I have many export Presets saved in Lightroom so whether I’m creating a Fine Art Print, a Greeting Card or a Tote Bag I know I can go to Lightroom and create the exact file I need quickly & easliy.

2:1 Zoom into Elizabeth Quay, Perth, Western Australia
Finally a quick 2:1 zoom in Lightroom shows just how much detail is available in such a hi-res image, if you look closely you can even read the “Mini Golf” banner near the entrance to Elizabeth Quay …
Image Details
Location: Perth City from South Perth
Date: 27th November 2017
Time: 5:14pm
No. of Images Stitched: 5
Camera: Canon EOS 5D Mk11
Lens: EF 70-200mm f/4L IS USM
Camera Mode: Manual
Exposure: 1/13 sec at f14
Post Processing
Buy Prints & Photo Products
It’s a proven fact that being out in nature is great for your mental and physical health.
While you won’t get the full health benefit from our range of prints and photo gifts they are always a great reminder of where you’d rather be.
So be sure to check out our range of Fine Art Prints at madcat.com.au and our unique photo gifts (scarves, wall tapestries, beach towels, tote bags and much more) at madaboutwa.com.au.
Cheers,
Dave
by Dave | Jul 11, 2017 | Lifestyle, Lightroom, News, ON1 Software, Our Journey, Photo Tips, Photos, Photoshop, Software, Workflow
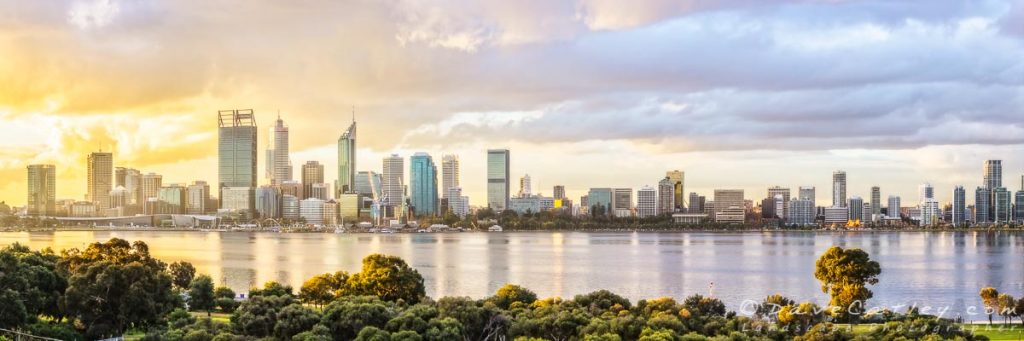
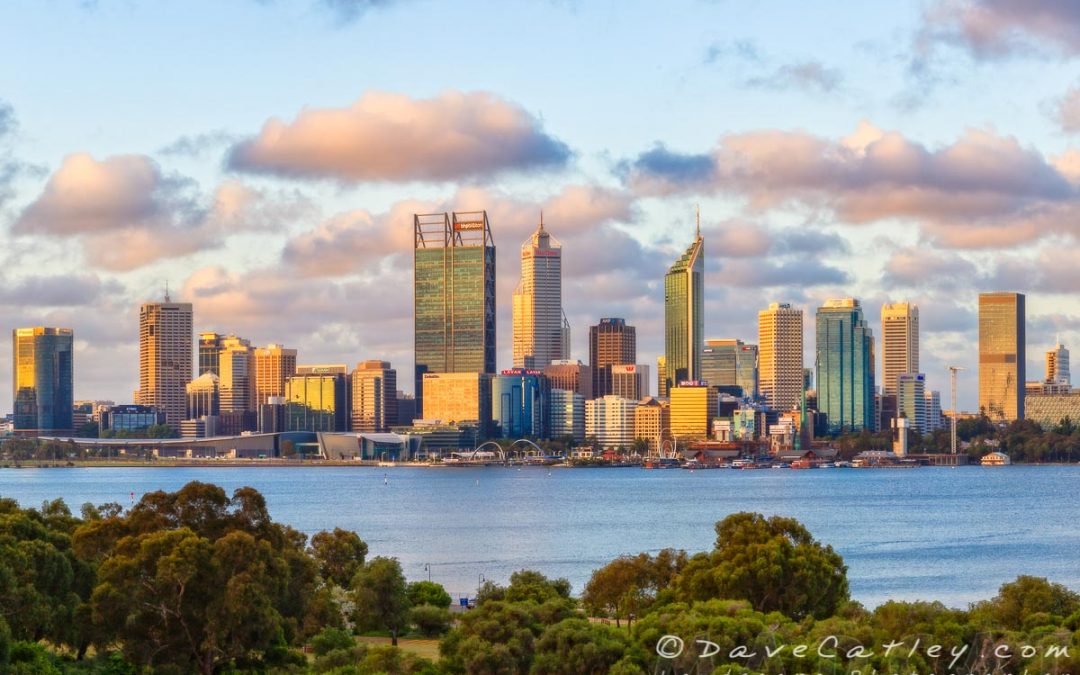
Afternoon City Glow, Perth City Skyline, Western Australia
We live in one of the cleanest & most beautiful cities in the world here in Perth and we think it’s time to showcase just how amazing the Perth City Skyline is.
We are currently in the enviable position of having access to a flat on Millpoint Road in South Perth with stunning views of the Perth City Skyline throughout the day. It never ceases to amaze me how much the colour & quality of light changes as the hours and days go by.
In this series of posts I’ll be showcasing unique images of the Perth City Skyline in all it’s glory and variety.

Afternoon City Glow, Perth City Skyline, Western Australia – Lightroom
This first image was taken last week just before sunset. There were plenty of clouds in the sky with many gaps through which the sun streamed as it approached the horizon.
I had my camera mounted on a tripod oriented vertically with my 70-200mm lens set to 70mm. The plan was to take a series of images and stitch them together in Lightroom to make a very high resolution image, it turned out to be 35MP in this instance. I set my camera up to take 3 bracketed images for each shot as the dynamic range looked liked a potential problem. Ironically I ended up only using the first image from each set, the dynamic range of modern camera’s has come a long way but it never hurts to be safe 🙂

Blowup of Elizabeth Quay from the Final 35MP Image to Show the Detail
To the West of the city the golden sun was filtered through the clouds providing a surreal golden glow that slowly faded towards the East into the cooler blue tones. The difference from one side to the other was enormous and simply breathtaking.
Afternoon City Glow, Perth City Skyline, Western Australia – Original
Replicating such an effect can be very tricky in Post Processing, what starts out as a living atmospheric glow as light bounces of particles in the air all around you simply becomes a flat dull haze when the image is first loaded into Lightroom. You can see from the original image above there there was not a lot of “magic” to it at all.
As always Lightroom did a great job of the initial processing which I then transferred to ON1 Photo Raw to add some effects and then into Photoshop for some final touches and to create my “Master File” for this image.
Afternoon City Glow, Perth City Skyline, Western Australia – ON1 Photo RAW
Image Details
Location: Perth City from South Perth
Date: 4th July 2017
Time: 5:32pm
No. of Images Stitched: 7
Camera: Canon EOS 5D Mk11
Lens: EF 70-200mm f/4L IS USM
Camera Mode: Manual
Exposure: 1/25 sec at f11
Post Processing
Buy Prints & Photo Products
It’s a proven fact that being out in nature is great for your mental and physical health.
While you won’t get the full health benefit from our range of prints and photo gifts they are always a great reminder of where you’d rather be.
So be sure to check out our range of Fine Art Prints at madcat.com.au and our unique photo gifts (scarves, wall tapestries, beach towels, tote bags and much more) at madaboutwa.com.au.
Cheers,
Dave
by Dave | Nov 2, 2016 | Lifestyle, Lightroom, ON1 Software, Our Journey, Photos, Photoshop, Software
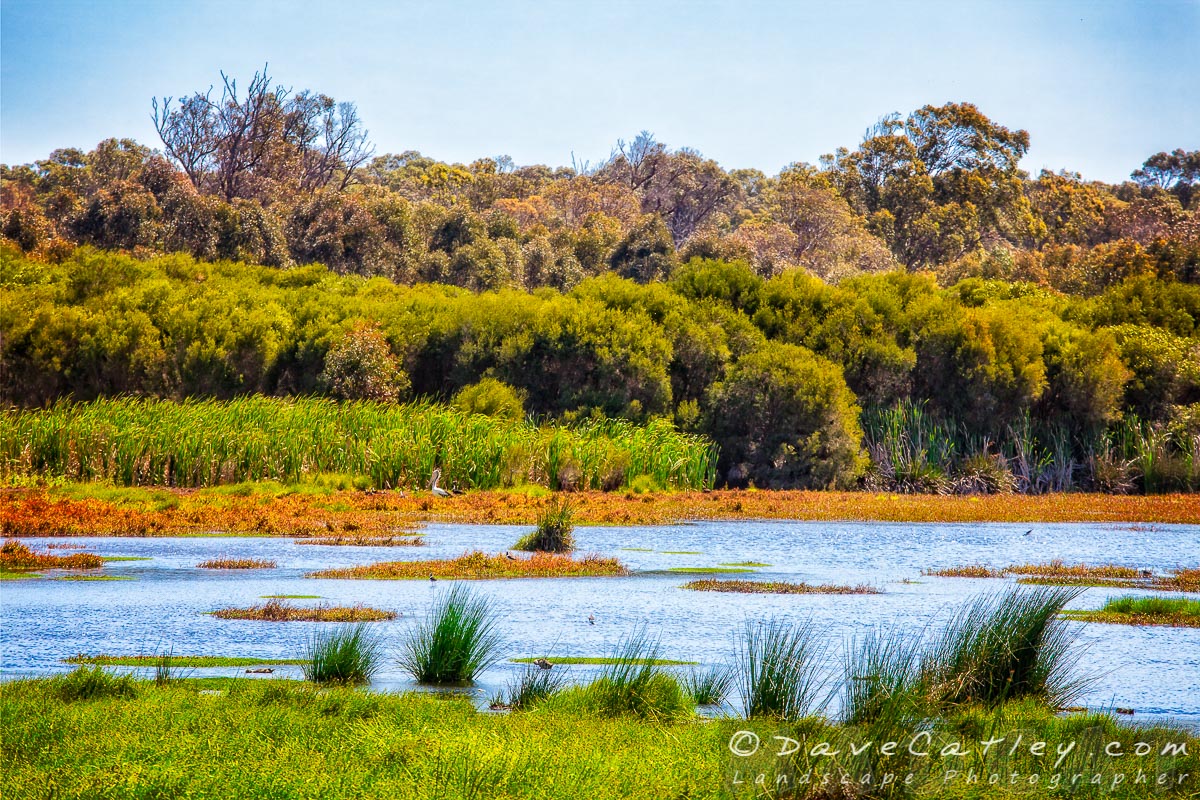
We heard that there are some baby Swans around Lake Wagardu in Yanchep National Park so we took a trip out there for our daily walk, sadly the Swans were a no-show but we did get to see a lot of other bird life around the Lake.

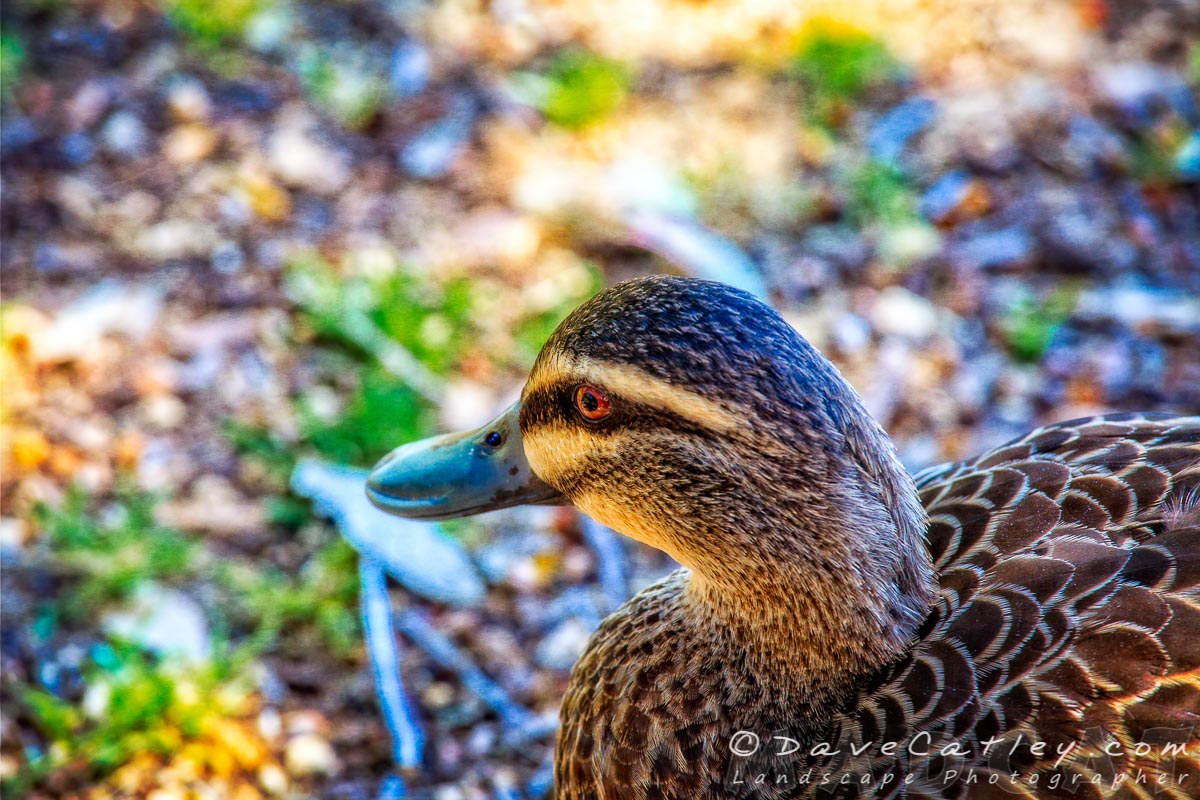
Abundant Bird Life, Yanchep National Park, Perth, Wester Australia
If you look closely at the above image you can see a Pelican and numerous other wading birds and ducks going about their daily business. The Park really is a natural wonder 🙂
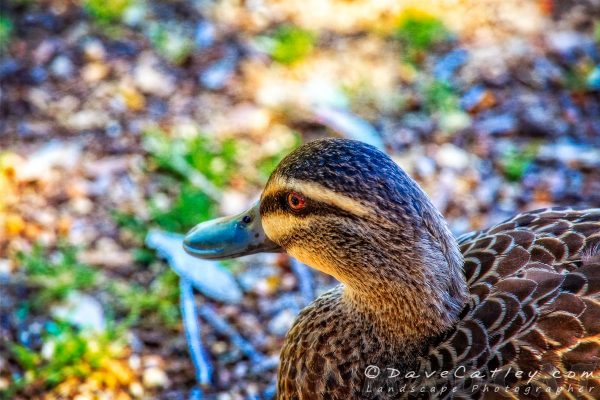
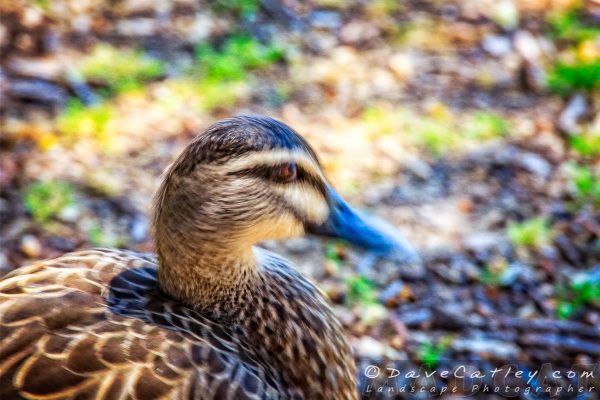
Hungry Duck, Yanchep National Park, Perth, Western Australia
One thing Yanchep National park has in abundance is Ducks!
When we sat on a park bench to eat our lunch three Pacific Black Ducks waddled on over to see if they could get some crumbs. One was immediately chased off by the other two, obviously he wasn’t part of the “In-Crowd”!
Luckily for the Ducks we know more about what is good for them than they do so they weren’t very lucky in the food department. It is really important not to feed Ducks or any other wild animals as it can upset the balance of nature as well as causing serious health problems according to the Department of Parks & Wildlife.
The first couple of Duck shots weren’t quite so sharp, something to do with having a shutter speed of 1/40th sec I suspect 😳 However, you can get some interesting shots of animals with slow shutter speeds sometimes, the first 2 photos I took looked like the Duck was shaking and nodding his head …
Duck Says No, Yanchep National Park, Perth, Western Australia

Duck Says Yes, Yanchep National Park, Perth, Western Australia
Maybe he was just going Quackers 
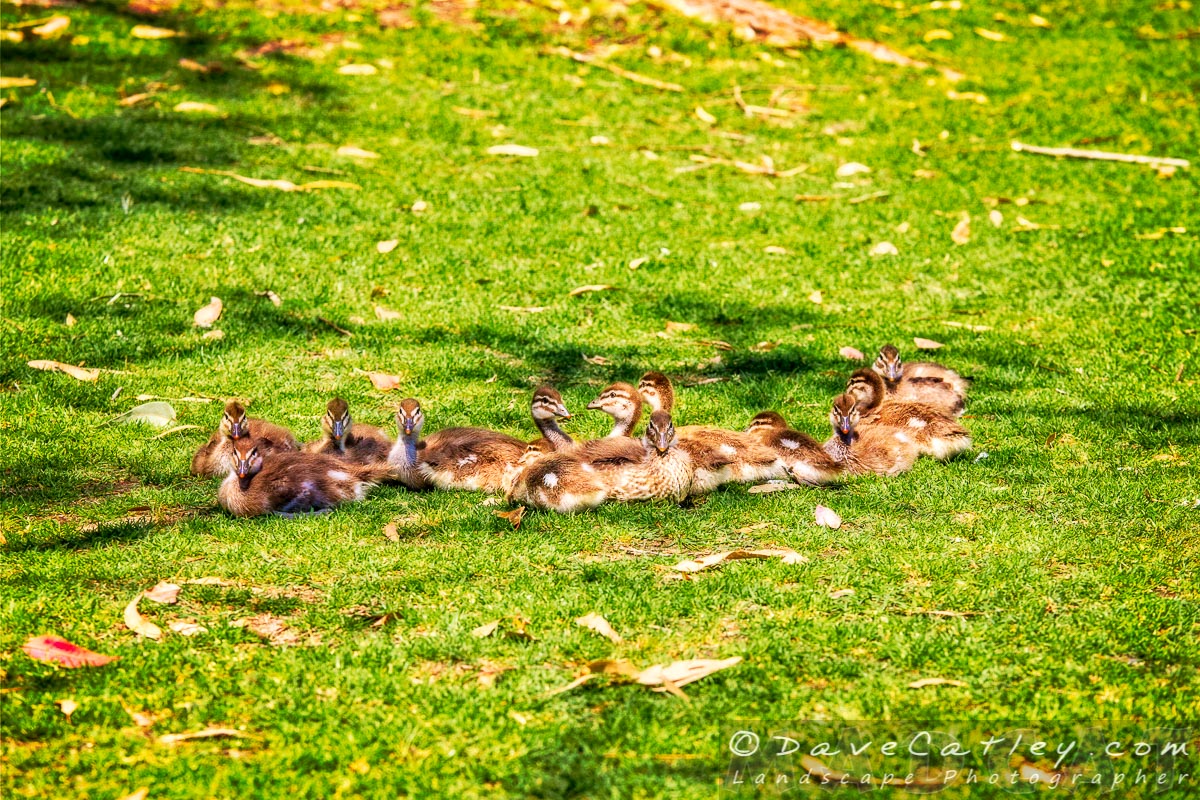
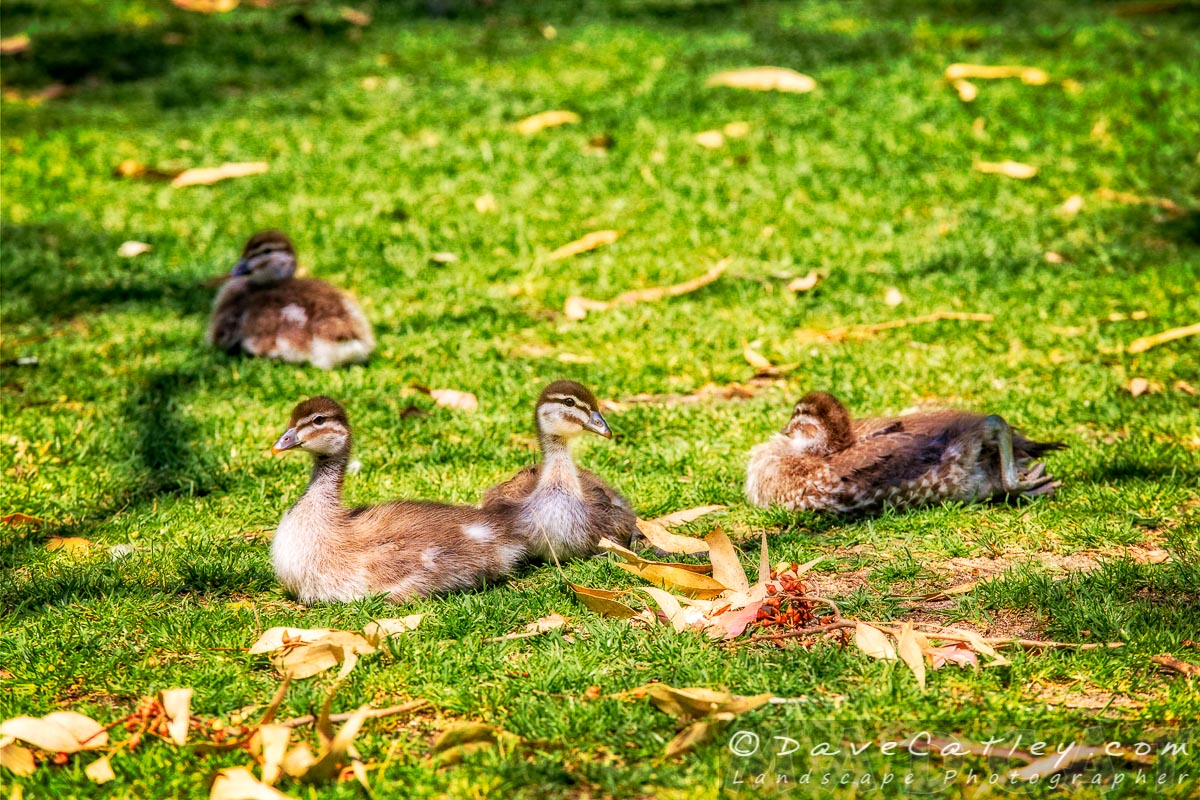
Being Spring there were also a lot of incredibly cute Ducklings around this extended family of Australian Wood Ducks were gorgeous …
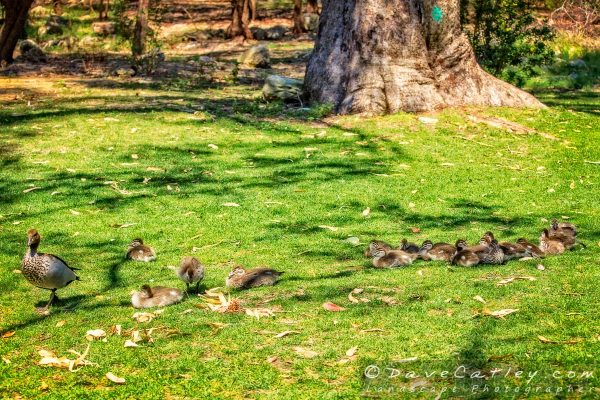
Duckling Creche, Yanchep National Park, Perth, Western Australia
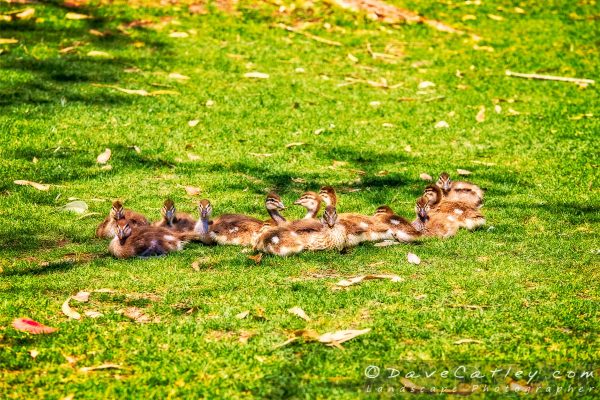
Spring Ducklings, Yanchep National Park, Perth, Western Australia
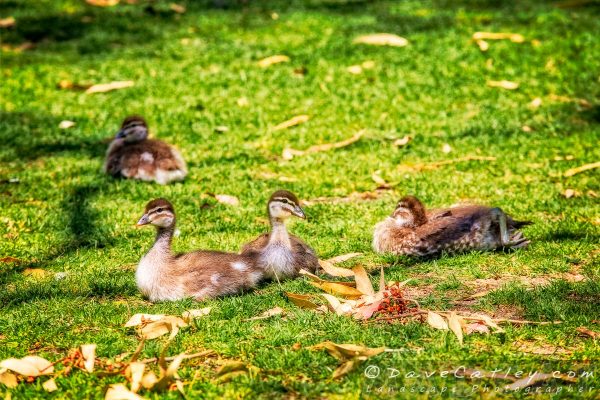
Ducklings On Watch, Yanchep National Park, Perth, Western Australia
These two Pacific Black Ducklings cuddled up by the Lake were pretty damn cute too …
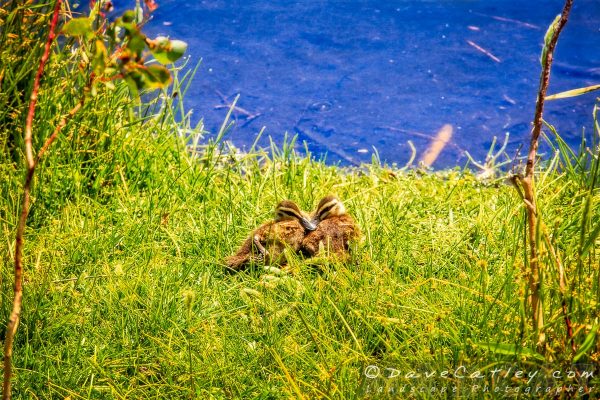
Twin Ducklings, Yanchep National Park, Perth, Western Australia
While on our walk around the lake I spotted this awesome carving on one of the tree stumps, no idea who did it but it looked cool.
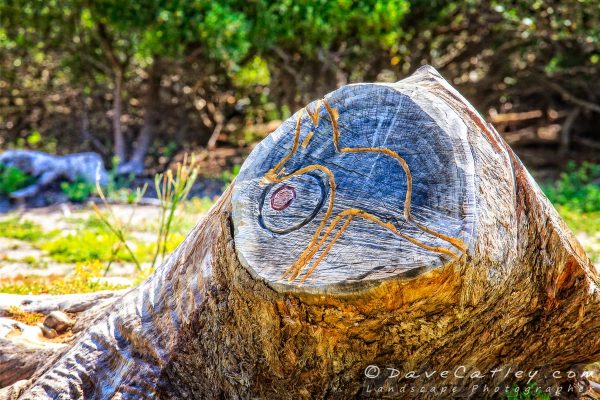
Kangaroo Carving, Yanchep National Park, Perth, Western Australia
Hopefully we’ll spot the Swan’s Cygnets on our next trip to the Park.
All of these images were processed in Lightroom CC & ON1 Photo 10 & Photoshop CC. You can download free trials of these programs or purchase them from the links below:
Cheers,
Dave
by Dave | Oct 21, 2016 | Articles, How To ..., Lightroom, News, ON1 Software, Sleeklens, Software
Lightroom Presets & Brushes are great tools to help you speed up your workflow and improve your creativity. You can create them yourself or purchase / download them from various websites.
This guide will teach you how to install Presets & Brushes that you have downloaded.
For those of you that are more familiar with how Windows / Mac OSX works then the Quick and Dirty guides should be more than enough. For others the Detailed Walkthroughs will tell you everything you need to know.
Installing Lightroom Presets – The Simple Method
Installing Lightroom presets from within Lightroom is a very quick and simple process:
Quick and Dirty:
- Go to the Lightroom Develop module
- Right click in the Presets tab to create a new folder if required
- Right click on the Preset folder you wish to import your new Presets to and select “Import”
- Locate the Presets to import and click the “Import” button
- Done!
Detailed Walkthrough:
- Locate the folder containing the Presets that you want to install.
If you have purchased online or downloaded free samples they will most likely be in a “zip” file
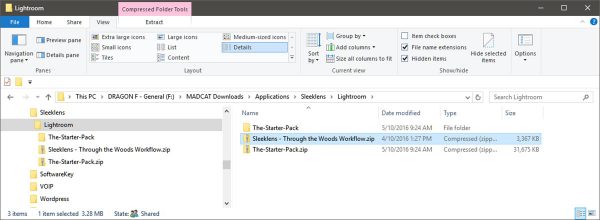
Locate the Downloaded Presets
- Unzip the file you downloaded (if required):
- Windows – Right click on the file, select “Extract All…”
- Mac – Doubleclick on the file
- Navigate to the unzipped folder containing the new Presets (they may be in a sub-folder). The Preset files will have a file extension of “.lrtemplate”
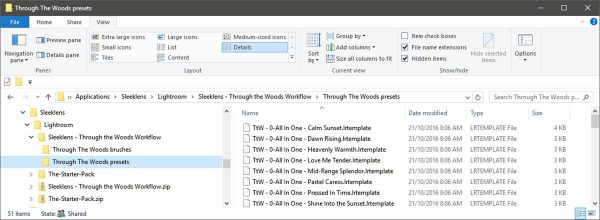
Locate the Extracted Preset Folder
- Copy the location of the Preset folder to the clipboard
- Windows – Right click on the Windows Explorer address bar and select “Copy address as text”
- Mac – Right click on the Finder folder then hold down the Option key and select “Copy <folder name> as Pathname”
- Run Lightroom and enter the “Develop” module
- At this point you can either:
- Select an existing Preset folder to install your presets into
- or …
- Right click anywhere in the Presets tab on the left and select “New Folder”
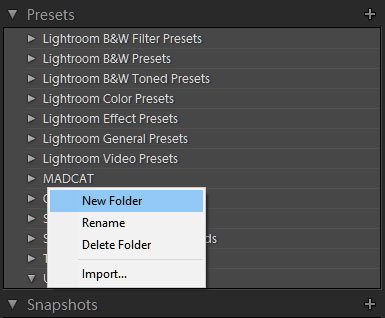
Create a New Preset Folder in Lightroom
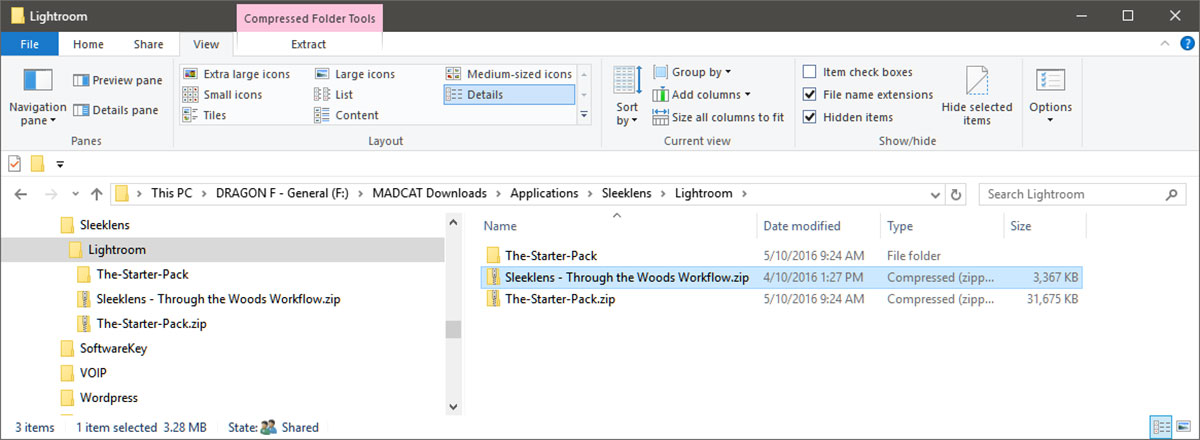
Name your folder something meaningful. I generally start with the name of the supplier and then the name of the collection if there will be more than 1 i.e. “Sleeklens – Through The Woods” so that all presets from the same supplier will be grouped together with each set in it’s own folder. But that’s just me, go with whatever floats your boat 🙂
- Right click on the chosen folder and select “Import” …
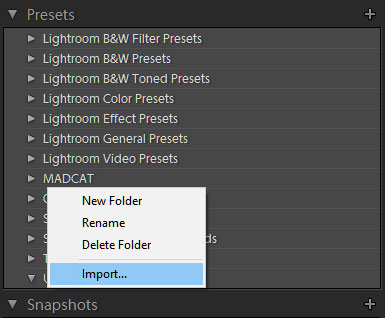
Import New Presets in Lightroom
- Locate the Presets you wish to install. If you copied the folder path in step 3 then paste it into the import window:
- Windows – Right click on the address bar and select “Edit address”, right click again and select “Paste” then press “Enter”
- Mac – Press “CMD+SHIFT+G” then “CMD+V” and click on “Go”
- Select the Presets to import and click “Import”
- Your Presets are now ready to use
- Done!
Installing Lightroom Presets – Behind the Scenes
If you want to understand what happens Behind the Scenes when you install presets or want to know how to do it manually it’s not really that much harder:
Quick and Dirty:
- Run Lightroom
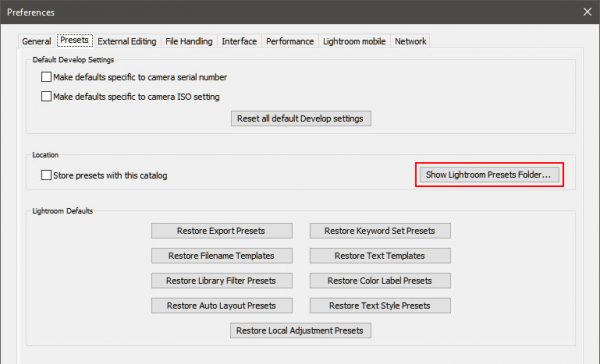
- Open the “Preferences” dialog
- Windows – Select “Preferences” in the “Edit” menu
- Mac – Select “Preferences” in the “Lightroom” menu
- Go to the “Presets” tab and click on “Show Lightroom Presets Folder …”.
A file explorer or finder window will open in the Adobe configuration area
- From here navigate into the “Lightroom\Develop Presets” folder
- Note, if you have selected “Store presests with this catalog in the Presets tab of the Preferences dialog box then you will have to navigate into the folder containing your catalog and then into “Lightroom Settings/Develop Presets” instead
- Create a new folder and copy your new Presets into it
- Restart Lightroom and your new Presets will be available in the “Develop” module
- Done!
Detailed Walkthrough:
If you need a detailed walkthrough then you probably shouldn’t be doing anything behind the scenes!
Installing Lightroom Brushes
For reasons known only to Adobe there is no interface in Lightroom to import new Brushes. You can create them yourself from the Local Adjustments area but if you want to add new ones you have purchased or downloaded then you’ll have to do it manually.
Ironically, the method for installing new Brushes is almost identical to the “Behind the Scenes” method for installing Presets that I described above!
Quick and Dirty:
- Run Lightroom
- Open the “Preferences” dialog box
- Windows – Select “Preferences” in the “Edit” menu (or press CTRL+,)
- Mac – Select “Preferences” in the “Lightroom” menu (or press CMD+,)
- Go to the “Presets” tab and click on “Show Lightroom Presets Folder …”.
A file explorer or finder window will open in the Adobe configuration area
- From here navigate into the “Lightroom\Local Adjustment Presets” folder
- Create a new folder and copy your new Brushes into it
- Restart Lightroom and your new Brushes will be available in the “Develop” module
- Done!
Detailed Walkthrough:
I know what you’re thinking, a few paragraphs ago I was telling you that you shouldn’t be going Behind the Scenes to install Presets if you needed a detailed walkthrough!
Now I’m telling you that this is the ONLY way to install new Brushes and here is a detailed walkthough … Don’t Panic it’s not that hard and if you follow the instructions below you’ll be fine, honest!
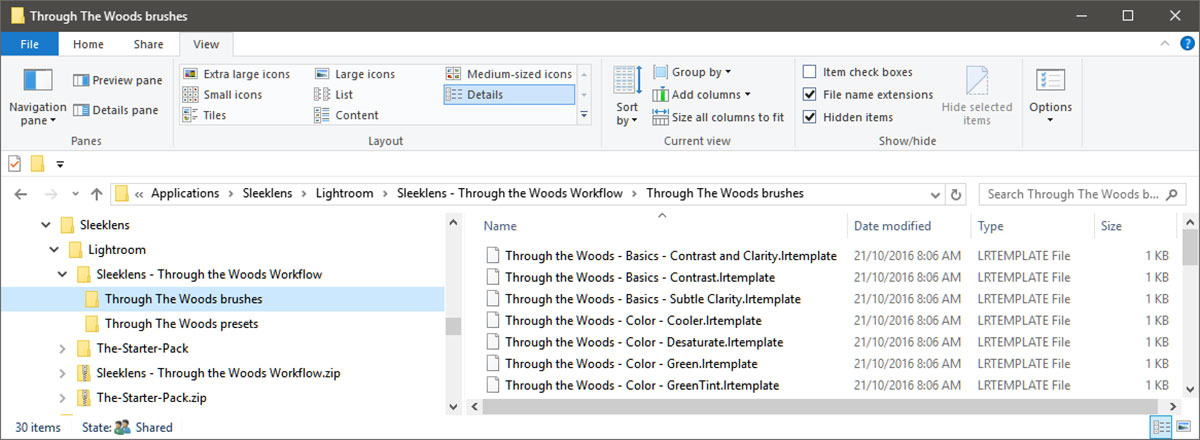
- Locate the folder containing the Brushes that you want to install.
If you have purchased online or downloaded free samples they will most likely be in a “zip” file
Locate the Downloaded Presets
- Unzip the file you downloaded (if required):
- Windows – Right click on the file and select “Extract All…”
- Mac – Doubleclick on the file
- Navigate to the unzipped folder containing the new Brushes (they may be in a sub-folder). The Brush files will have a file extension of “.lrtemplate”
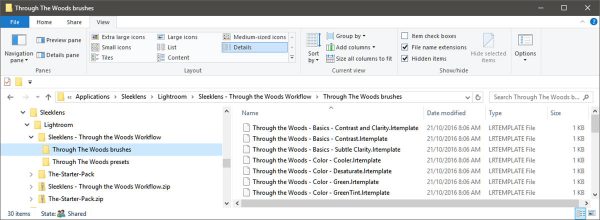
Locate the Extracted Brushes Folder
- Run Lightroom
- Open the “Preferences” dialog box
- Windows – Select “Preferences” in the “Edit” menu (or press CTRL+,)
- Mac – Select “Preferences” in the “Lightroom” menu (or press CMD+,)
Lightroom Preferences – Preset Tab
- Go to the “Presets” tab and click on “Show Lightroom Presets Folder …”.
A file explorer or finder window will open in the Adobe configuration area
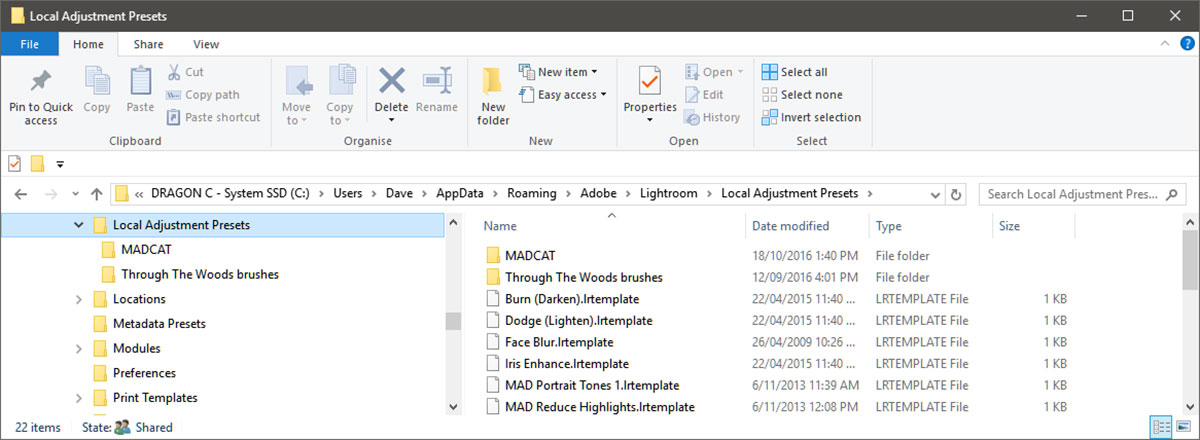
- From here navigate into the “Lightroom\Local Adjustment Presets” folder
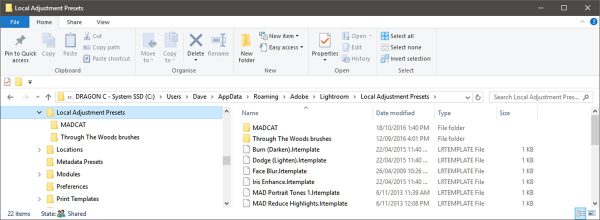
Locate the Lightroom Local Adjustment Folder
- Note, if you have selected “Store presests with this catalog in the Presets tab of the Preferences dialog box then you will have to navigate into the folder containing your catalog and then into the “Lightroom Settings/Local Adjustment Presets” folder instead
- Create a new folder
- Windows – Right click on the “Local Adjustment Presets” folder and select New->Folder
- Mac – Right click inside the “Local Adjustment Presets” folder and select “New Folder”
- Name your folder something meaningful. This is not as useful as it is with Presets as Lightroom will not display the folder name but it helps with managing your Brushes.
As with the Presets I generally start with the name of the supplier and then the name of the collection if there will be more than 1 i.e. “Sleeklens – Through The Woods” but that’s just me, go with whatever tickles your fancy 🙂
- Go to the file explorer or finder containing your new Brushes (see step 2)
- Select the Brushes (CTRL+A / CMD+A)
- Copy the Brushes to the clipboard (CTRL+C / CMD+C)
- Paste the Brushes into the folder you have just created (CTRL+V / CMD+V)
- Restart Lightroom and your new Brushes will be available in the Local Adjustments area in the “Develop” module
- Done!
Now that you know how to install new Lightroom Presets and Brushes the World is your Oyster!
There are numerous free Lightroom Presets and Brushes out there to play around with, here are a few suggestions that we recommend:


Subscribe to our VIP Club for Free
Click here for more information
Thankyou for joining our VIP list!