How To Install Lightroom Presets & Brushes

Lightroom Presets & Brushes are great tools to help you speed up your workflow and improve your creativity. You can create them yourself or purchase / download them from various websites.
This guide will teach you how to install Presets & Brushes that you have downloaded.
For those of you that are more familiar with how Windows / Mac OSX works then the Quick and Dirty guides should be more than enough. For others the Detailed Walkthroughs will tell you everything you need to know.
Installing Lightroom Presets – The Simple Method

Installing Lightroom presets from within Lightroom is a very quick and simple process:
Quick and Dirty:
- Go to the Lightroom Develop module
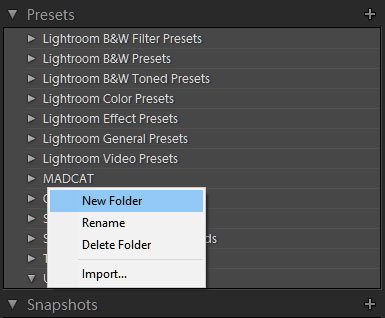
- Right click in the Presets tab to create a new folder if required
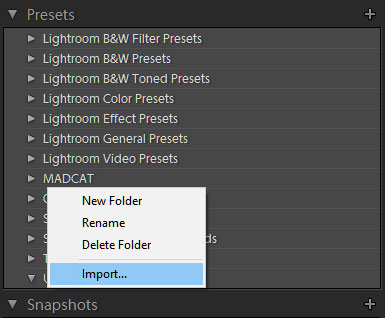
- Right click on the Preset folder you wish to import your new Presets to and select “Import”
- Locate the Presets to import and click the “Import” button
- Done!
Detailed Walkthrough:
- Locate the folder containing the Presets that you want to install.
If you have purchased online or downloaded free samples they will most likely be in a “zip” file - Unzip the file you downloaded (if required):
- Windows – Right click on the file, select “Extract All…”
- Mac – Doubleclick on the file
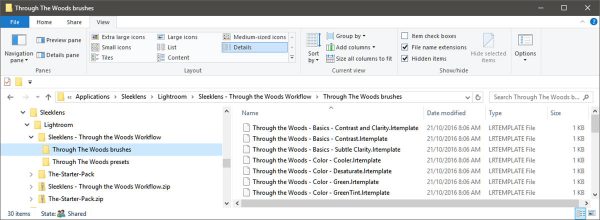
- Navigate to the unzipped folder containing the new Presets (they may be in a sub-folder). The Preset files will have a file extension of “.lrtemplate”
- Copy the location of the Preset folder to the clipboard
- Windows – Right click on the Windows Explorer address bar and select “Copy address as text”
- Mac – Right click on the Finder folder then hold down the Option key and select “Copy <folder name> as Pathname”
- Run Lightroom and enter the “Develop” module
- At this point you can either:
- Select an existing Preset folder to install your presets into
- or …
- Right click anywhere in the Presets tab on the left and select “New Folder”
Name your folder something meaningful. I generally start with the name of the supplier and then the name of the collection if there will be more than 1 i.e. “Sleeklens – Through The Woods” so that all presets from the same supplier will be grouped together with each set in it’s own folder. But that’s just me, go with whatever floats your boat 🙂
- Right click on the chosen folder and select “Import” …
- Locate the Presets you wish to install. If you copied the folder path in step 3 then paste it into the import window:
- Windows – Right click on the address bar and select “Edit address”, right click again and select “Paste” then press “Enter”
- Mac – Press “CMD+SHIFT+G” then “CMD+V” and click on “Go”
- Select the Presets to import and click “Import”
- Your Presets are now ready to use
- Done!
Installing Lightroom Presets – Behind the Scenes

If you want to understand what happens Behind the Scenes when you install presets or want to know how to do it manually it’s not really that much harder:
Quick and Dirty:
- Run Lightroom
- Open the “Preferences” dialog
- Windows – Select “Preferences” in the “Edit” menu
- Mac – Select “Preferences” in the “Lightroom” menu
- Go to the “Presets” tab and click on “Show Lightroom Presets Folder …”.
A file explorer or finder window will open in the Adobe configuration area - From here navigate into the “Lightroom\Develop Presets” folder
- Note, if you have selected “Store presests with this catalog in the Presets tab of the Preferences dialog box then you will have to navigate into the folder containing your catalog and then into “Lightroom Settings/Develop Presets” instead
- Create a new folder and copy your new Presets into it
- Restart Lightroom and your new Presets will be available in the “Develop” module
- Done!
Detailed Walkthrough:
If you need a detailed walkthrough then you probably shouldn’t be doing anything behind the scenes!
Installing Lightroom Brushes

For reasons known only to Adobe there is no interface in Lightroom to import new Brushes. You can create them yourself from the Local Adjustments area but if you want to add new ones you have purchased or downloaded then you’ll have to do it manually.
Ironically, the method for installing new Brushes is almost identical to the “Behind the Scenes” method for installing Presets that I described above!
Quick and Dirty:
- Run Lightroom
- Open the “Preferences” dialog box
- Windows – Select “Preferences” in the “Edit” menu (or press CTRL+,)
- Mac – Select “Preferences” in the “Lightroom” menu (or press CMD+,)
- Go to the “Presets” tab and click on “Show Lightroom Presets Folder …”.
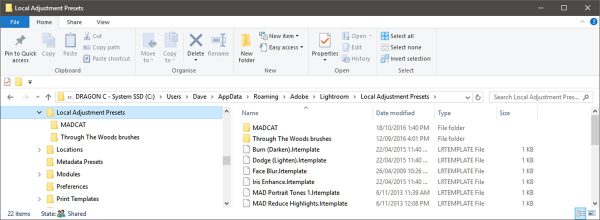
A file explorer or finder window will open in the Adobe configuration area - From here navigate into the “Lightroom\Local Adjustment Presets” folder
- Create a new folder and copy your new Brushes into it
- Restart Lightroom and your new Brushes will be available in the “Develop” module
- Done!
Detailed Walkthrough:
I know what you’re thinking, a few paragraphs ago I was telling you that you shouldn’t be going Behind the Scenes to install Presets if you needed a detailed walkthrough!
Now I’m telling you that this is the ONLY way to install new Brushes and here is a detailed walkthough … Don’t Panic it’s not that hard and if you follow the instructions below you’ll be fine, honest!
- Locate the folder containing the Brushes that you want to install.
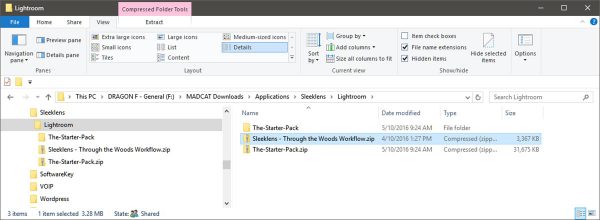
If you have purchased online or downloaded free samples they will most likely be in a “zip” file - Unzip the file you downloaded (if required):
- Windows – Right click on the file and select “Extract All…”
- Mac – Doubleclick on the file
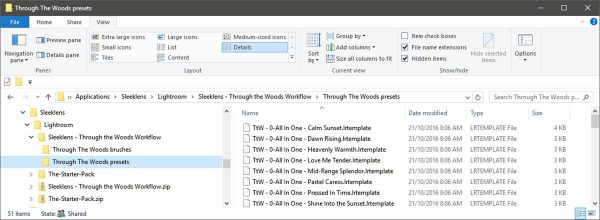
- Navigate to the unzipped folder containing the new Brushes (they may be in a sub-folder). The Brush files will have a file extension of “.lrtemplate”
- Run Lightroom
- Open the “Preferences” dialog box
- Windows – Select “Preferences” in the “Edit” menu (or press CTRL+,)
- Mac – Select “Preferences” in the “Lightroom” menu (or press CMD+,)
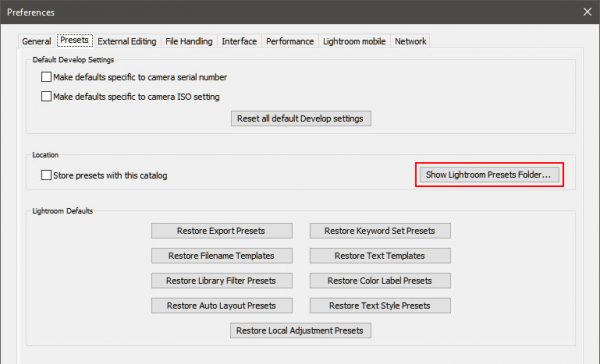
Lightroom Preferences – Preset Tab
- Go to the “Presets” tab and click on “Show Lightroom Presets Folder …”.
A file explorer or finder window will open in the Adobe configuration area - From here navigate into the “Lightroom\Local Adjustment Presets” folder
- Note, if you have selected “Store presests with this catalog in the Presets tab of the Preferences dialog box then you will have to navigate into the folder containing your catalog and then into the “Lightroom Settings/Local Adjustment Presets” folder instead
- Create a new folder
- Windows – Right click on the “Local Adjustment Presets” folder and select New->Folder
- Mac – Right click inside the “Local Adjustment Presets” folder and select “New Folder”
- Name your folder something meaningful. This is not as useful as it is with Presets as Lightroom will not display the folder name but it helps with managing your Brushes.
As with the Presets I generally start with the name of the supplier and then the name of the collection if there will be more than 1 i.e. “Sleeklens – Through The Woods” but that’s just me, go with whatever tickles your fancy 🙂
- Go to the file explorer or finder containing your new Brushes (see step 2)
- Select the Brushes (CTRL+A / CMD+A)
- Copy the Brushes to the clipboard (CTRL+C / CMD+C)
- Paste the Brushes into the folder you have just created (CTRL+V / CMD+V)
- Restart Lightroom and your new Brushes will be available in the Local Adjustments area in the “Develop” module
- Done!
Now that you know how to install new Lightroom Presets and Brushes the World is your Oyster!
There are numerous free Lightroom Presets and Brushes out there to play around with, here are a few suggestions that we recommend:

Subscribe to our VIP Club for Free
Click here for more information
Thankyou for joining our VIP list!