by Dave | Sep 29, 2018 | Articles, How To ..., Landscape Photos, Lightroom, ON1 Software, Photo Processing, Photo Tips, Photo Tutorials, Photoshop, Software
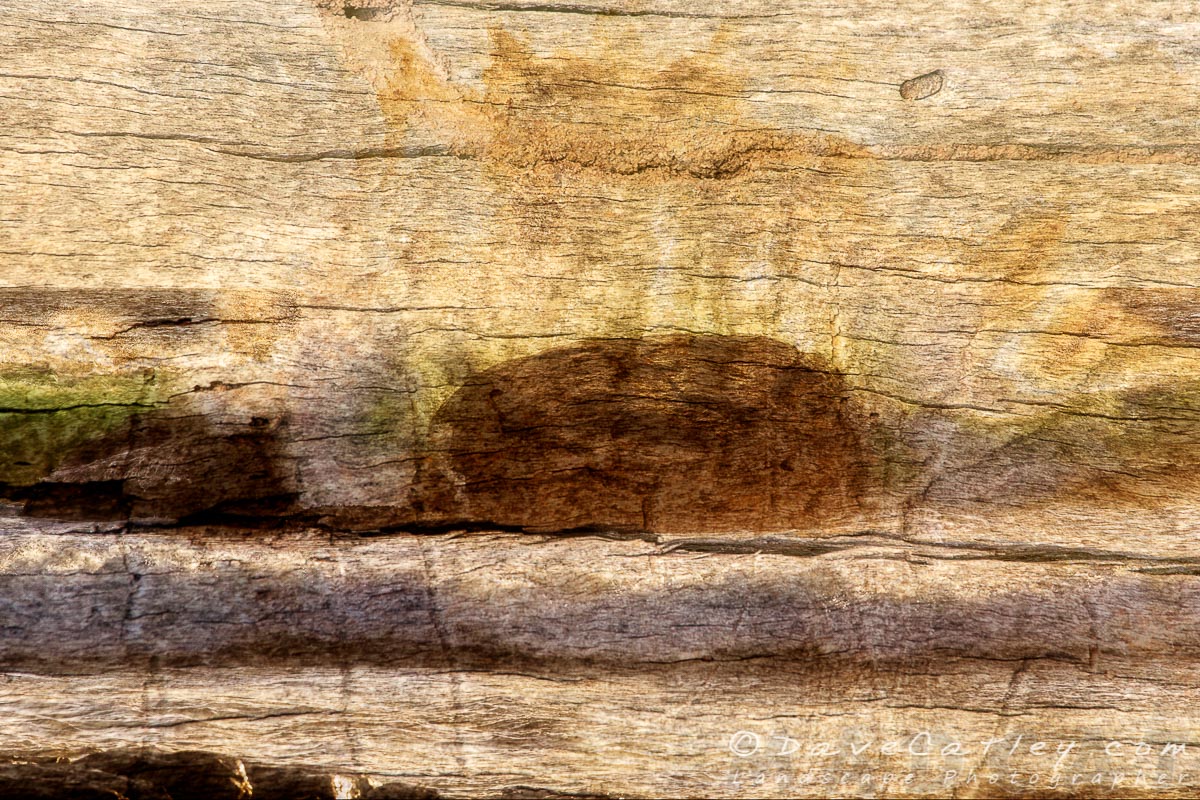
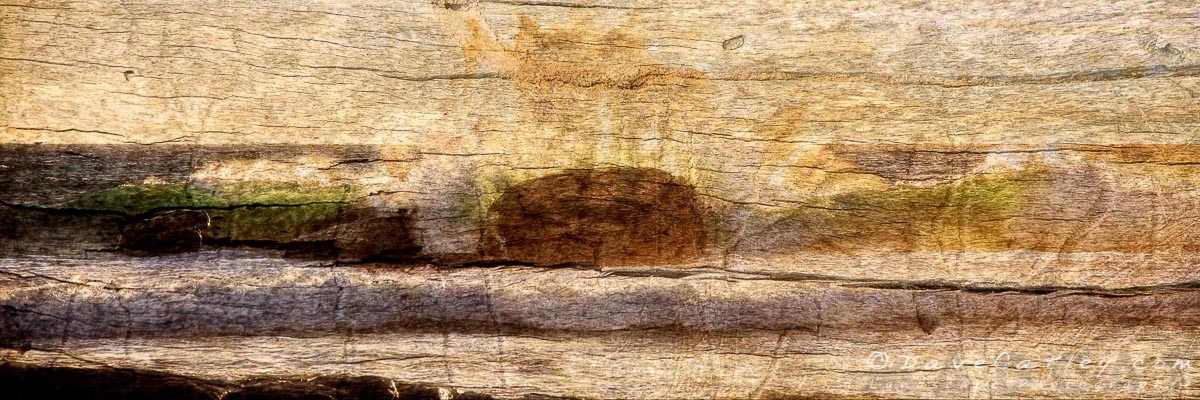
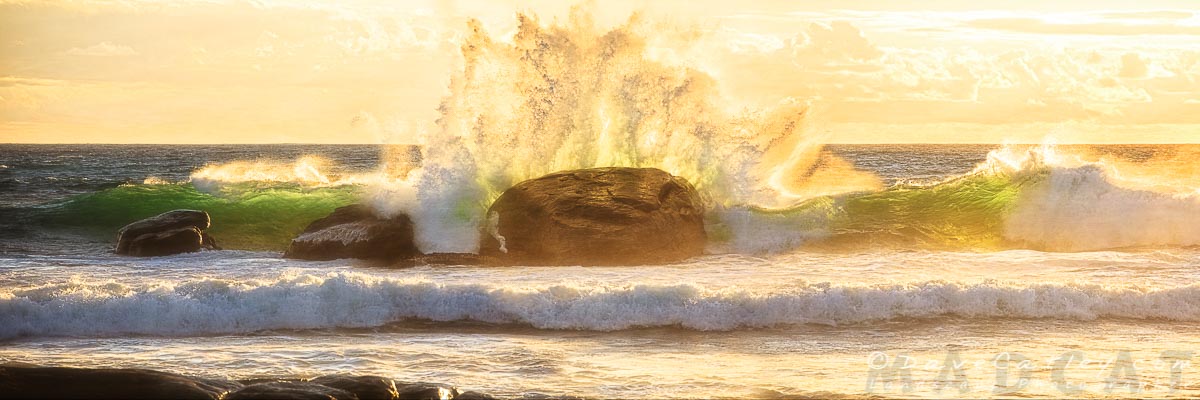
Waves on Wood is an new image I have created recently to give the illusion of a photographic print on a wooden plank. The original image “Crashing Waves” on Redgate Beach in Margaret River can be seen & purchased here.
While it is possible to transfer images onto wood or even print directly on wood it is not a process that is available or practical for many of us so I have been playing around with a process in Photoshop for combining photos and textures to give the illusion of a print on wood.

Waves on Wood, Redgate Beach, Margaret River Region, Western Australia – Photographic Art
How cool will this look as a 60″ canvas in your living room?
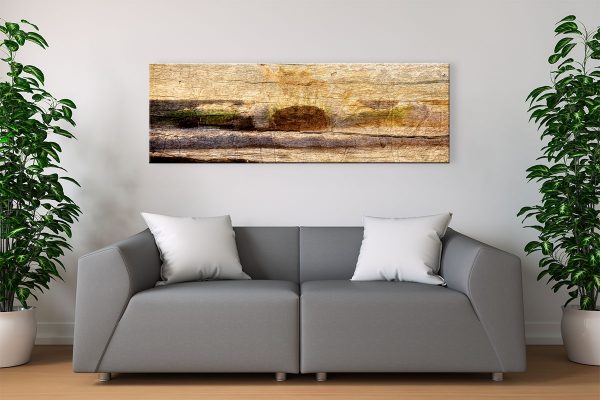
Waves on Wood, Redgate Beach, Margaret River Region, Western Australia – Living Room Canvas
Compare the Textured Image with the original image “Crashing Waves on Redgate Beach”
Post Processing
If you’re interested in the technique used to create this effect then here are the basics (though the exact settings will vary depending on the photo & the textures being used):
- Open your image in Photoshop
- Open your texture image in Photoshop and resize it to the same dimensions as your photo
- Copy and paste your wood texture over your photo as a new layer
- Set the blending mode of the texture layer to
- Set the blending mode of the texture layer to something like “Darken” or Multiply”
- Duplicate your texture layer (CTRL/CMD + J)
- Set the blending mode of the second texture layer to “Soft Light” or “Overlay”
- You can now adjust the blending modes & opacity of the texture layers to get an effect you like
- You can also replace one of the textures with an alternate texture for different effects or even add additional textures, the sky’s the limit
This image was created using a combination of Adobe Lightroom Classic CC, Adobe Photoshop CC 2018 & ON1 Photo RAW 2018.
Visit Our Gallery
Visit our Gallery at Shop 136 Wanneroo Markets, 33 Prindiville Drive in Wangara to see more of our Fine Art Images & Photo Products.
Also available at the Gallery are Greeting Cards, Magnets, Keyrings, unique 3D Printed Gadgets & Gizmo’s and much more …
Cheers,
Dave

by Dave | Aug 2, 2018 | How To ..., Photoshop, Software
 Way back in 2010 I wrote a blog post about a very annoying Photoshop feature where the text “copy” was appended to the name of any layer or layer group that you duplicated. To this day I still get comments thanking me for providing the simple (though not obvious) solution to prevent this behavior so I though it was time to do a new up-to-date post documenting the fix.
Enough waffle what’s the answer?
Since the introduction of Adobe Photoshop CS5 you have been able to turn this feature off (and back on) much to the relief of many Photoshoppers, and the same process still applies today in Photoshop CC 2018 😎
If you happen to find this feature useful, essential or just plain don’t care then feel free to have a browse through my Portfolio while you’re here 😀

Photoshop – Layers Panel Options
Sometimes it’s amazing how the little things can be such a pain to deal with, either constantly renaming layers or putting up with nasty little “copy” tags all over the place became very annoying. With every new Photoshop release I was always searching the preference screens hoping that a fix would be implemented, finally with CS5 an option was added to turn this feature off!
But did Adobe make it easy to find, of course not, where would be the fun in that 🙄
Anyway, I eventually found it nestled in the Layers Panel drop down menu where you can still find it today. Who knows, maybe it will make it into one of the the “Preferences” screens one day, we can only hope!
The Solution (CS5 to CC 2018)
- Click on the dropdown menu
 on the top right of the Layers Panel
- Select Panel Options near the bottom and you’ll get the “Layers Panel Options” window up (see right)
- Look at the bottom of the “Layers Panel Options” window to see where Adobe have hidden this little treasure
- Titled “Add ‘copy’ to Copied Layers and Groups” the new checkbox will default to ticked, simply untick it to enable one of the most powerful changes in Photoshop known to mankind 😎
Cheers,
Dave
by Dave | Oct 21, 2016 | Articles, How To ..., Lightroom, News, ON1 Software, Sleeklens, Software
Lightroom Presets & Brushes are great tools to help you speed up your workflow and improve your creativity. You can create them yourself or purchase / download them from various websites.
This guide will teach you how to install Presets & Brushes that you have downloaded.
For those of you that are more familiar with how Windows / Mac OSX works then the Quick and Dirty guides should be more than enough. For others the Detailed Walkthroughs will tell you everything you need to know.
Installing Lightroom Presets – The Simple Method
Installing Lightroom presets from within Lightroom is a very quick and simple process:
Quick and Dirty:
- Go to the Lightroom Develop module
- Right click in the Presets tab to create a new folder if required
- Right click on the Preset folder you wish to import your new Presets to and select “Import”
- Locate the Presets to import and click the “Import” button
- Done!
Detailed Walkthrough:
- Locate the folder containing the Presets that you want to install.
If you have purchased online or downloaded free samples they will most likely be in a “zip” file
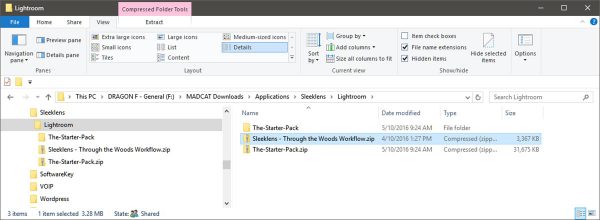
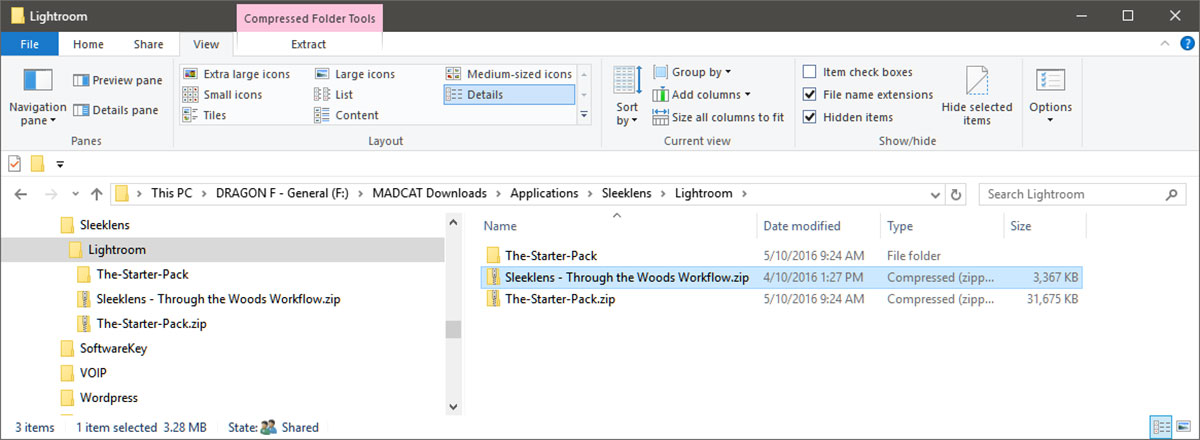
Locate the Downloaded Presets
- Unzip the file you downloaded (if required):
- Windows – Right click on the file, select “Extract All…”
- Mac – Doubleclick on the file
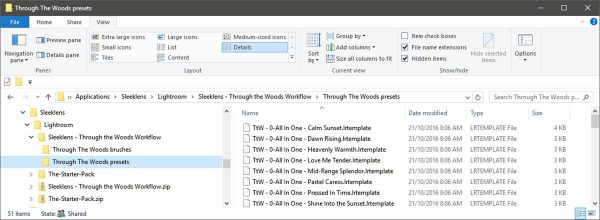
- Navigate to the unzipped folder containing the new Presets (they may be in a sub-folder). The Preset files will have a file extension of “.lrtemplate”
Locate the Extracted Preset Folder
- Copy the location of the Preset folder to the clipboard
- Windows – Right click on the Windows Explorer address bar and select “Copy address as text”
- Mac – Right click on the Finder folder then hold down the Option key and select “Copy <folder name> as Pathname”
- Run Lightroom and enter the “Develop” module
- At this point you can either:
- Select an existing Preset folder to install your presets into
- or …
- Right click anywhere in the Presets tab on the left and select “New Folder”
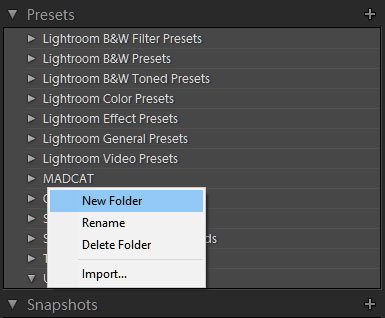
Create a New Preset Folder in Lightroom
Name your folder something meaningful. I generally start with the name of the supplier and then the name of the collection if there will be more than 1 i.e. “Sleeklens – Through The Woods” so that all presets from the same supplier will be grouped together with each set in it’s own folder. But that’s just me, go with whatever floats your boat 🙂
- Right click on the chosen folder and select “Import” …
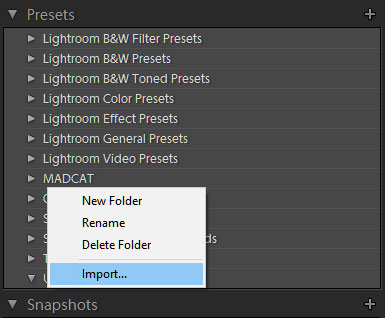
Import New Presets in Lightroom
- Locate the Presets you wish to install. If you copied the folder path in step 3 then paste it into the import window:
- Windows – Right click on the address bar and select “Edit address”, right click again and select “Paste” then press “Enter”
- Mac – Press “CMD+SHIFT+G” then “CMD+V” and click on “Go”
- Select the Presets to import and click “Import”
- Your Presets are now ready to use
- Done!
Installing Lightroom Presets – Behind the Scenes
If you want to understand what happens Behind the Scenes when you install presets or want to know how to do it manually it’s not really that much harder:
Quick and Dirty:
- Run Lightroom
- Open the “Preferences” dialog
- Windows – Select “Preferences” in the “Edit” menu
- Mac – Select “Preferences” in the “Lightroom” menu
- Go to the “Presets” tab and click on “Show Lightroom Presets Folder …”.
A file explorer or finder window will open in the Adobe configuration area
- From here navigate into the “Lightroom\Develop Presets” folder
- Note, if you have selected “Store presests with this catalog in the Presets tab of the Preferences dialog box then you will have to navigate into the folder containing your catalog and then into “Lightroom Settings/Develop Presets” instead
- Create a new folder and copy your new Presets into it
- Restart Lightroom and your new Presets will be available in the “Develop” module
- Done!
Detailed Walkthrough:
If you need a detailed walkthrough then you probably shouldn’t be doing anything behind the scenes!
Installing Lightroom Brushes
For reasons known only to Adobe there is no interface in Lightroom to import new Brushes. You can create them yourself from the Local Adjustments area but if you want to add new ones you have purchased or downloaded then you’ll have to do it manually.
Ironically, the method for installing new Brushes is almost identical to the “Behind the Scenes” method for installing Presets that I described above!
Quick and Dirty:
- Run Lightroom
- Open the “Preferences” dialog box
- Windows – Select “Preferences” in the “Edit” menu (or press CTRL+,)
- Mac – Select “Preferences” in the “Lightroom” menu (or press CMD+,)
- Go to the “Presets” tab and click on “Show Lightroom Presets Folder …”.
A file explorer or finder window will open in the Adobe configuration area
- From here navigate into the “Lightroom\Local Adjustment Presets” folder
- Create a new folder and copy your new Brushes into it
- Restart Lightroom and your new Brushes will be available in the “Develop” module
- Done!
Detailed Walkthrough:
I know what you’re thinking, a few paragraphs ago I was telling you that you shouldn’t be going Behind the Scenes to install Presets if you needed a detailed walkthrough!
Now I’m telling you that this is the ONLY way to install new Brushes and here is a detailed walkthough … Don’t Panic it’s not that hard and if you follow the instructions below you’ll be fine, honest!
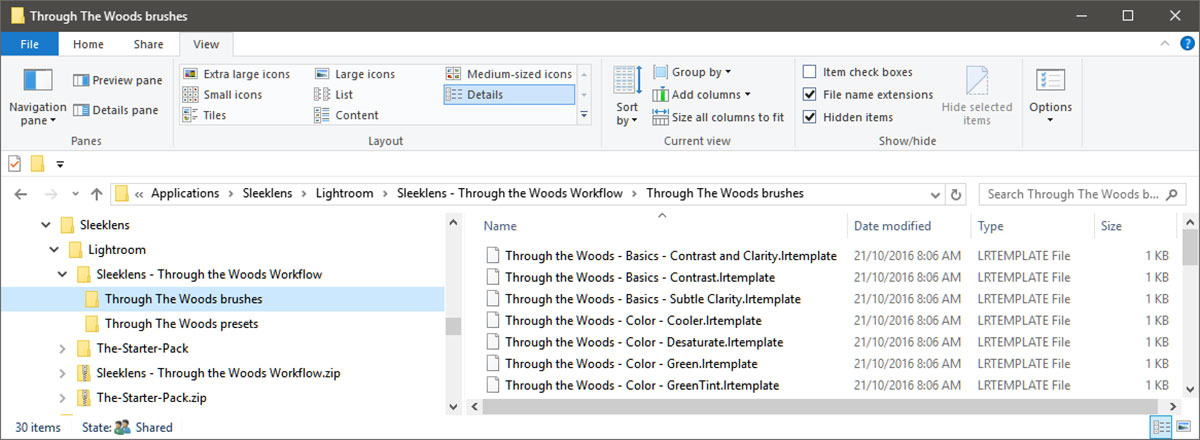
- Locate the folder containing the Brushes that you want to install.
If you have purchased online or downloaded free samples they will most likely be in a “zip” file
Locate the Downloaded Presets
- Unzip the file you downloaded (if required):
- Windows – Right click on the file and select “Extract All…”
- Mac – Doubleclick on the file
- Navigate to the unzipped folder containing the new Brushes (they may be in a sub-folder). The Brush files will have a file extension of “.lrtemplate”
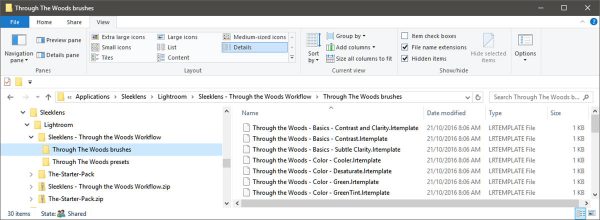
Locate the Extracted Brushes Folder
- Run Lightroom
- Open the “Preferences” dialog box
- Windows – Select “Preferences” in the “Edit” menu (or press CTRL+,)
- Mac – Select “Preferences” in the “Lightroom” menu (or press CMD+,)
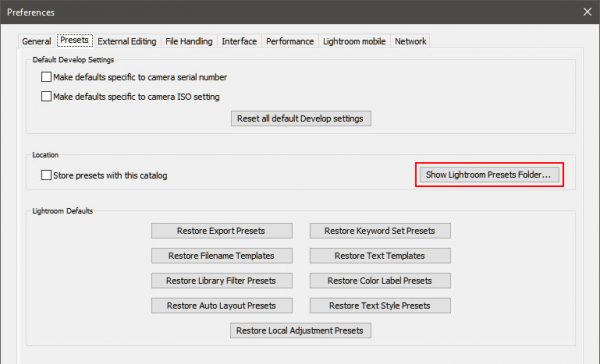
Lightroom Preferences – Preset Tab
- Go to the “Presets” tab and click on “Show Lightroom Presets Folder …”.
A file explorer or finder window will open in the Adobe configuration area
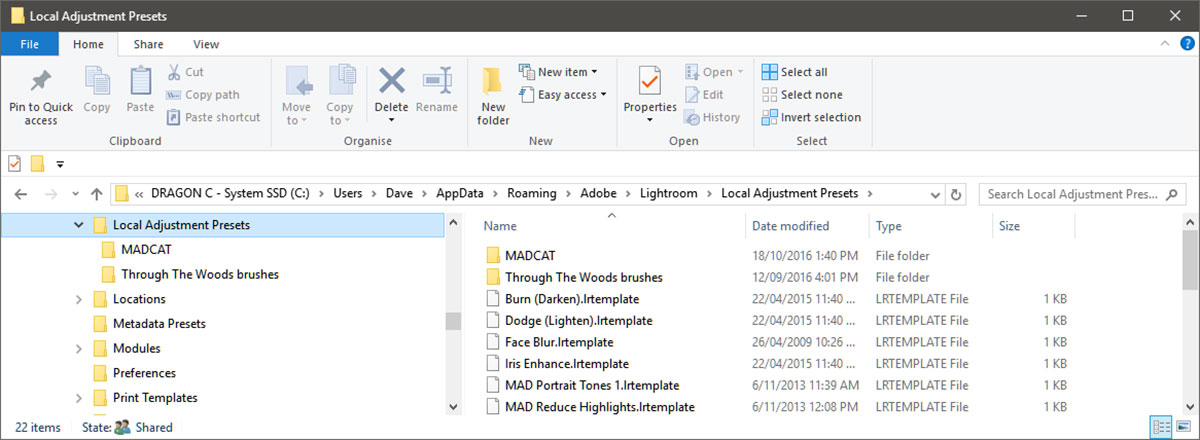
- From here navigate into the “Lightroom\Local Adjustment Presets” folder
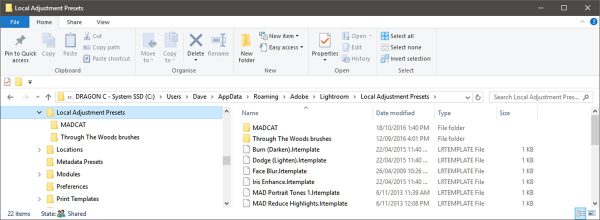
Locate the Lightroom Local Adjustment Folder
- Note, if you have selected “Store presests with this catalog in the Presets tab of the Preferences dialog box then you will have to navigate into the folder containing your catalog and then into the “Lightroom Settings/Local Adjustment Presets” folder instead
- Create a new folder
- Windows – Right click on the “Local Adjustment Presets” folder and select New->Folder
- Mac – Right click inside the “Local Adjustment Presets” folder and select “New Folder”
- Name your folder something meaningful. This is not as useful as it is with Presets as Lightroom will not display the folder name but it helps with managing your Brushes.
As with the Presets I generally start with the name of the supplier and then the name of the collection if there will be more than 1 i.e. “Sleeklens – Through The Woods” but that’s just me, go with whatever tickles your fancy 🙂
- Go to the file explorer or finder containing your new Brushes (see step 2)
- Select the Brushes (CTRL+A / CMD+A)
- Copy the Brushes to the clipboard (CTRL+C / CMD+C)
- Paste the Brushes into the folder you have just created (CTRL+V / CMD+V)
- Restart Lightroom and your new Brushes will be available in the Local Adjustments area in the “Develop” module
- Done!
Now that you know how to install new Lightroom Presets and Brushes the World is your Oyster!
There are numerous free Lightroom Presets and Brushes out there to play around with, here are a few suggestions that we recommend:


Subscribe to our VIP Club for Free
Click here for more information
Thankyou for joining our VIP list!